Posted on Leave a comment

Stop The Software Waste!

When was the last time you checked your company’s monthly spending on software subscriptions?

One of my fellow founders recently told me a story about two Professional Hubspot accounts ($1,600 per month each) that his company was paying for until someone noticed that employees who should have been using these accounts left the company six months ago. 

According to a recent Forbes article, half of U.S. companies waste over 10% of their software budgets. That sums up to around $10B in 2023 only, and the problem seems to increase, as SaaS spending is growing worldwide. According to Zylo, in 2022, SaaS spending surpassed on-premises software spending for the first time, and by 2024 large organizations will be wasting $17M+ on average on unused or redundant SaaS applications.

This opened a whole new market for technology management companies like Zylo or Oomnitza, but guess what? They are using the same SaaS subscription model! Essentially, you have to pay more to start paying less. 

Looking for change

Let me get back for a moment to the $10B wasted by U.S. companies on SaaS in 2023. 

I am from Ukraine, and my country is at war now. Since the beginning of the war, U.S. and European countries have been constantly sending humanitarian aid to Ukraine, and the total amount between Feb 24th, 2022, and May 31, 2023, is $5B (I’m not counting military support here, just emergency assistance, health care, and refugee programs). Think about it for a moment – all this humanitarian aid could easily be financed by just cutting the software waste by half in the U.S. only!

We’ve gotten so used to services and software sold by subscription (thank you Google, Netflix, Amazon, and others!) that we almost forgot that software can be run privately. And that takes me to another observation that eventually led to a change in Activechat’s business model.

Embracing security and compliance

As personal data protection rules get more and more restrictive, businesses are forced to review their privacy protection measures and data processing policies. And relying on dozens of SaaS subscriptions can easily become a substantial obstacle on the way to proper compliance. Each cloud software provider relies on a different combination of data protection algorithms, third-party services, and analytics tools. Tracking the actual routes that your data travels outside of your company can easily become a challenge of its own. 

When we get to sensitive customer data (like personal information or order details) that can be used in customer support conversations, the situation becomes even more complicated. A lot of conversational AI systems, especially the ones that use generative AI, rely on third-party Large Language Models (LLMs), and their potential security vulnerabilities are a major talking point now. Some companies (Apple or Samsung, for example) are banning the use of third-party generative AI models just because of their potential security and privacy issues.

Switching to on-premise

Back in 2021, when we started shifting Activechat from being an SMB-oriented chatbot platform into a complete conversational AI and customer service tool, we noticed that the majority of our potential customers were already using some sort of custom-built software on their premises. It could be a custom CRM, an ERP, or even a homemade chatbot program, but the fact was there – these guys were open to using software in their private cloud or on-premises, but were extremely cautious about subscribing to yet another SaaS product. For some companies, the absence of an on-premises version of Activechat was an absolute deal-breaker.

The reasons for this were quite different. Some teams mentioned company security policies, others were concerned about growing usage costs or potential data breaks, but the fact was there – they wanted to own the software and data, instead of relying on a subscription service.

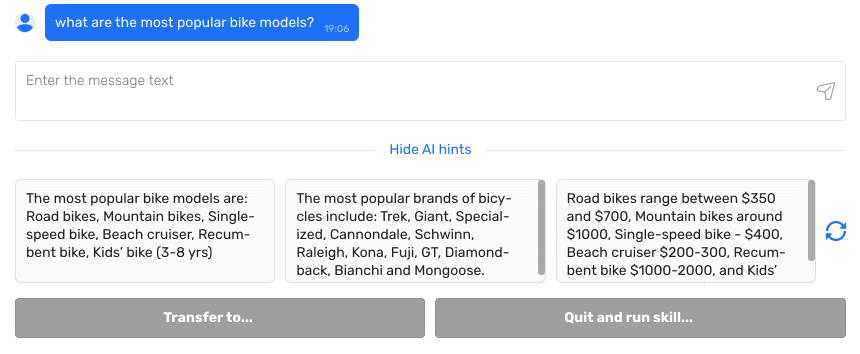
As Large Language Models started to conquer the chatbot space, another concern appeared, and it was latency. On average, requests to OpenAI’s API take 3 to 7 seconds each, and the delays can get even larger with advanced models like GPT-4. For some customers this kind of latency was unacceptable, so we decided to dive deeper into the on-premises models and local LLM hosting.

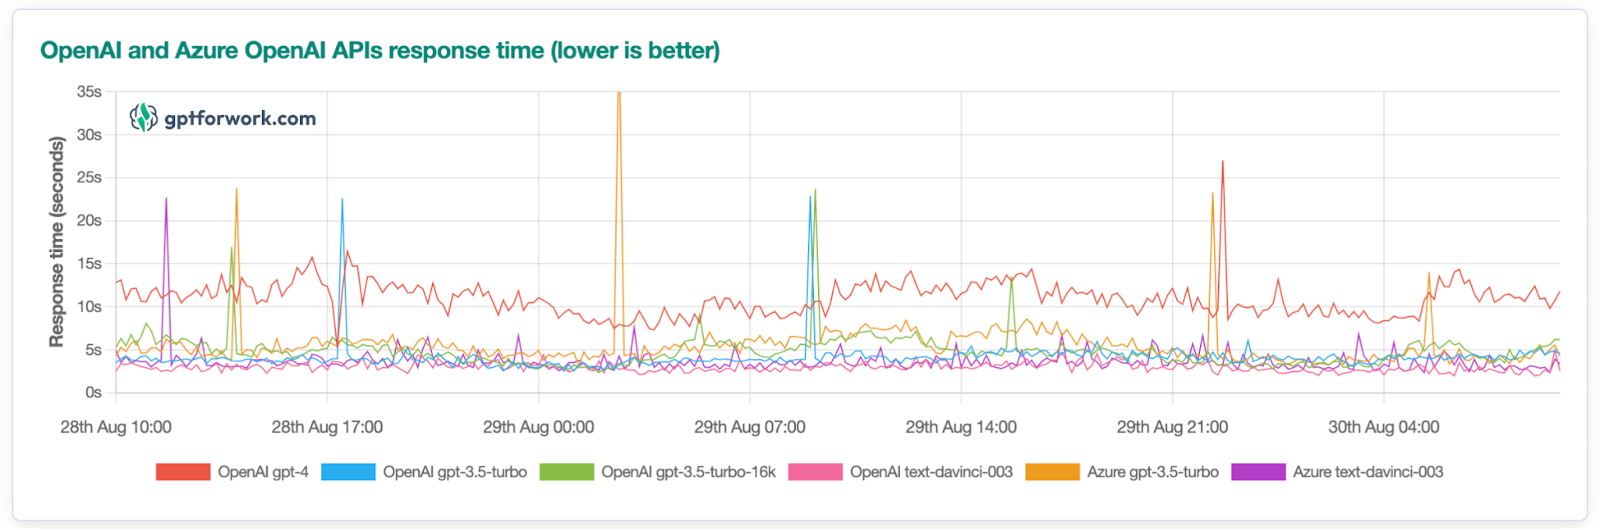
(Image credit: GPTforwork.com )

This eventually led us to the development of a stand-alone version of Activechat, which can be run in a private cloud or on-premises, within the internal IT infrastructure of any company.

Pros and cons

On-premises and private cloud installations are quite different from “software-as-a-service” (SaaS) subscriptions, so let’s dive deeper into their benefits and limitations. SaaS (Software-as-a-Service) is hosted in the cloud and accessed via the internet, with a subscription-based payment model, while on-premises software is installed locally on an organization’s servers and managed in-house, often involving an upfront investment and greater control over customization and updates. While cloud and SaaS options offer their own set of benefits, on-premises installations provide a compelling case for those seeking greater control, security, and customization over their Conversational AI platform.

  1. Enhanced Data Privacy and Security:

With sensitive customer data being processed and stored during Conversational AI interactions, data security becomes a top concern. On-premises installations allow organizations to keep data within their own servers, reducing the risk of unauthorized access or data breaches common in cloud-based systems. This level of control instills confidence in customers, meeting the strictest data privacy regulations and industry standards.

  1. Full Customization and Flexibility:

Every business has unique requirements when it comes to Conversational AI. On-premises installations offer the freedom to customize the platform to cater precisely to these specific needs. Organizations can modify algorithms, add or remove features, integrate with existing systems seamlessly, and adapt the solution as their requirements evolve, without being limited by a third-party provider’s offerings.

  1. Low Latency and High Performance:

On-premises installations ensure that all AI processing takes place within the organization’s local network. As a result, Conversational AI responses are faster and more reliable, reducing latency and enhancing overall performance. This is especially crucial for businesses that require real-time interactions and smooth user experiences.

  1. Compliance and Regulatory Adherence:

Certain industries, such as finance, healthcare, and government, have strict compliance regulations that govern data handling. On-premises installations give businesses complete control over data compliance measures, ensuring adherence to industry-specific regulations. This control helps build trust among customers and partners.

  1. Cost-Efficient for Long-Term Use:

While cloud and SaaS solutions might appear cost-effective initially, long-term expenses can escalate as usage grows. On-premises installations typically involve a one-time upfront investment with minimal recurring costs, making them a cost-efficient option in the long run, particularly for larger organizations with high usage volumes.

  1. Minimal Downtime and Dependency on External Services:

Cloud and SaaS solutions are vulnerable to internet connectivity issues or downtime experienced by third-party providers. On-premises installations reduce dependency on external services, ensuring continuity in service availability even during internet outages.

There are downsides too, of course. 

First of all, there’s an initial upfront investment into the software license and some infrastructure (private server or cloud). However, modern cloud service providers offer a wide range of options at affordable prices, and the remote installation process that we designed does 90% of the job for you automatically. And in the long run, the operating costs for the private cloud solution will be much cheaper compared to a monthly or annual SaaS subscription.

If you prefer on-premises installation, you will need to integrate Activechat into your existing IT infrastructure, and this may require some technical expertise. Again, we have your back covered with our team of DevOps engineers who can install Activechat almost anywhere! (We’re still working on that Raspberry Pi LLaMa project though 😁) 

Also, for on-premises installations, the performance of your server and the bandwidth of your Internet connection will be key factors that affect the response times and latency. Also, scalability for high usage periods could become an issue too. That’s why we advise using private cloud solutions over on-premises installations for those customers who experience irregularities in the volume of conversations. Private clouds combine the best of both worlds – the security and privacy of on-premises solutions with the scalability of a cloud.  

In conclusion, an on-premises installation for a Conversational AI platform provides businesses with greater control, security, and flexibility, making it an excellent choice for organizations prioritizing data privacy, customization, compliance, and long-term cost efficiency. However, the decision ultimately depends on each business’s unique needs and priorities, and a careful evaluation of the available options is crucial before making a choice. Check the table below for more details. 

Aspect of Conversational AIPros of SaaS SolutionPros of On-Premises (Private Cloud) Solution
Data Security and Control– Convenient, managed by the provider.– Scalability and resource allocation managed by the provider.
– Limited control over data security measures.– Direct oversight of security protocols and compliance, ensuring data integrity.
Customization and Flexibility– Quick deployment and minimal setup required.– Extensive customization and flexibility for tailored solutions.
– Limited customization options, often standardized.– Ability to fine-tune algorithms, features, and integration according to specific needs.
Performance and Latency– Low upfront costs, pay-as-you-go model.– Reduced latency due to localized data processing. Ideal for real-time interactions.
– Potential for performance degradation during peak usage.– Dedicated resources ensure consistent, optimal performance even under heavy workloads.
Cost Structure– Lower upfront investment.– Higher upfront costs for hardware, licenses, and setup.
– Recurring subscription fees might accumulate over time.– Long-term operational costs can be lower due to reduced subscription fees and greater control.
Data Compliance and Ownership– Compliance managed by provider.– Full ownership of data compliance measures, adhering to industry regulations.
– Limited control over data handling practices.– Ensured adherence to data ownership and industry-specific regulations.
Scaling and Resource Allocation– Scalability and resource allocation managed by provider.– Direct control over resource allocation, scaling according to specific needs.
– Limited flexibility in scaling for high-demand periods.– Ability to optimize resources for peak performance and efficient scaling.

License types

We offer two types of licenses for Activechat – Company and Developer. Although the names are pretty self-descriptive, let’s dive into some differences between them. Each license is lifetime, meaning that you can use your copy of the software indefinitely (provided that you comply with the terms of use). 

Company license is tailored for businesses and organizations who plan to use Activechat for their own needs only. It allows a single installation (one instance of the platform, running on your custom domain) and an unlimited number of projects, bots, users, and everything else. 

Every platform feature is included with this type of license, except the billing system. 

For experienced teams, agencies, and software companies we are offering the Developer license. It allows an unlimited number of installations (multiple platform instances running on multiple domains). Also, it includes the billing system which can be connected to your company’s Stripe account to collect monthly payments from your customers.

This type of license also includes the complete TypeScript source code of the platform, and developer documentation, which allows you to add new features to the platform and develop a new version of it on your own. 

For more details, visit our pricing page.

Installation

The installation process for the on-premise version of Activechat is simple and straightforward. 

  1. Get and set up your own private cloud according to the instructions that we provide:
  2. Create a private cloud account with one of our technology partners (we advise using Google Cloud)

    – OR –
  3. Create a virtual private cloud on a computer within your company’s network
  4. Download and run the installation package.
  5. Register your license.
  6. Create your first project and invite your team.
  7. [OPTIONAL] Import your existing data into the platform.

Support and updates

As we continue to develop Activechat, new versions of the platform will become available. To streamline the update process, we designed a custom procedure that will safely update your on-premise or local cloud system.

Before the update or new feature is released to the general public, we test it thoroughly on a number of different installations to make sure that it is 100% compatible with the previous version. When we make it available, you will be notified through email and get a notification on the platform. Once you confirm the update, it will be done automatically through the Internet. In case anything goes wrong after the update, you will be able to roll back immediately to the previous version, and that will create a support ticket for our team automatically.  

Sunsetting the cloud service

Starting September 2023, we will be gradually sunsetting our cloud service. If you already have an account with Activechat, we will reach out to you shortly with a discounted offer for the private cloud or on-premises license, and if you decide to switch, we will seamlessly copy all of your existing data into your new setup. 

Upgrading new trial accounts to the “Company” and “Team” plans will be disabled starting Sep 1st, 2023. 

If you have any questions about the change, please send an email to ask@activechat.ai

FAQ

What is the difference between SaaS (“software-as-a-service”) and on-premise or private cloud software?

SaaS (Software-as-a-Service) is hosted in the cloud and accessed via the internet, with a subscription-based payment model, while on-premise software is installed locally on an organization’s servers, or in a private cloud, often involving an upfront investment for software license and greater control over customization and updates.

In 2023, companies are increasingly turning towards on-premise and private cloud solutions for several reasons, particularly when dealing with conversational data and large language models. These solutions offer enhanced data privacy and security, crucial as data breaches become more sophisticated. On-premise and private cloud deployments grant organizations greater control over their sensitive conversational AI data, addressing concerns related to compliance and data ownership. Moreover, with the exponential growth of large language models, organizations seek to optimize performance and minimize latency, which on-premise installations can provide due to localized processing. This shift reflects a strategic move towards safeguarding data, ensuring compliance, and achieving optimal performance in the context of evolving technology landscapes.

How seamless is the transition from our existing SaaS solution to an on-premise or private cloud setup? What steps are involved in migrating our data and configurations?

If you already have projects running in the Activechat cloud solution, the transition will be 100% seamless. Your data will be copied into your new platform during the setup process.

With other conversational AI platforms, the process may get a bit more complex, involving custom data export and processing. We have successfully imported data from Intercom, Hubspot, Zendesk, Livechat, and other customer service tools. 

Contact us for more details.

How would adopting an on-premise solution impact the performance and latency of our conversational AI platform, especially when dealing with real-time interactions and responsiveness?

The latency will be reduced substantially, and you will notice an improved performance instantly.  Localized data processing reduces the time it takes for data to travel to and from external cloud servers, leading to significantly lower latency.

Why on-premise solution is better for running customized and fine-tuned large language models (LLMs)?

An on-premise solution offers several advantages for running customized and fine-tuned large language models (LLMs):

  • Tailored Customization: The level of control over LLMs that on-premise solutions offer extends to adjusting algorithms, parameters, and fine-tuning models for domain-specific vocabulary and nuances.
  • Reduced Latency: Customized LLMs used for real-time applications benefit from reduced latency in on-premise environments, as data processing takes place locally.
  • Experimentation and Testing: Fine-tuning LLMs involves experimentation and iterative testing. On-premise solutions enable you to conduct these experiments in a controlled environment, facilitating rapid iterations without concerns about external factors.
  • Business Differentiation: Fine-tuned LLMs often serve as a competitive differentiator. With on-premise solutions, you can create and maintain proprietary models that set your business apart from competitors relying on generic cloud-based solutions.

Can you explain how an on-premise solution enhances data security for our conversational AI platform compared to our current SaaS setup?

Switching from a SaaS (Software-as-a-Service) setup to an on-premise solution for your conversational AI platform can significantly enhance data security in several ways:

  • Local Data Storage: With an on-premise solution, all your conversational data is stored within your organization’s own servers, located within your controlled environment. This eliminates the need to transmit sensitive data to external cloud servers, reducing the risk of data exposure during transit.
  • Reduced Attack Surface: On-premise installations often involve fewer points of entry for potential cyberattacks, as the data is not accessible via the public internet. This reduces the attack surface and minimizes the potential vulnerabilities that can be exploited by malicious actors.
  • Physical Access Control: With on-premise solutions, you have direct control over who can access your data physically. You can implement strict access controls and security measures at the physical server locations, further safeguarding against unauthorized access.
  • Customized Security Measures: On-premise setups allow you to implement security measures tailored to your organization’s specific needs. This can include encryption protocols, firewalls, intrusion detection systems, and other advanced security practices that align with your security policies.
  • Regulatory Compliance: For industries with strict data regulations like healthcare, finance, and government, on-premise solutions offer better compliance control. You can design security practices that align with specific regulatory requirements, ensuring your conversational AI platform adheres to necessary data protection standards.
  • Minimized Third-Party Involvement: SaaS solutions often rely on third-party providers for data storage and processing. Shifting to an on-premise solution reduces dependency on external providers, putting you in charge of all aspects of your data security.
  • Isolated Environment: An on-premise solution operates within your organization’s local network, isolated from the broader internet. This isolation can mitigate the risks associated with external cyber threats and attacks targeting cloud-based systems.
  • Immediate Response Control: In the event of a security incident, you have immediate control and the ability to respond without relying on a third-party provider to manage the situation.

By adopting an on-premise solution for your conversational AI platform, you can strengthen data security by exercising greater control over data storage, access, and security measures. This can lead to enhanced protection against data breaches, compliance violations, and other security risks that are inherent in cloud-based SaaS setups.

Could you provide a breakdown of the cost implications associated with switching to an on-premise solution for a conversational AI platform?

It’s important to note that while upfront costs for on-premise solutions tend to be higher due to the initial investment into the software license and setup, long-term operational expenses will be lower than recurring subscription fees associated with SaaS solutions. Over time, the investment in your own infrastructure will pay off, particularly for organizations with significant data processing needs or those seeking to maintain control over data and customization.

We cannot provide exact quotes, since they depend on your setup type (private cloud or on-premises), volume of conversations, and a number of other important factors. 

Please contact us for more detailed information about the operating costs. 

Will you continue to develop Activechat?

Definitely! We’re not shutting down the product, we just change our focus and business model. There’s a huge demand for enterprise conversational AI solutions, and we’ll be focusing on generative AI, privately hosted large language models, and AI-based analytics from now on. 

How do I get new versions when you release updates to the platform?

When new features become available, you will get a notification in the platform and an email. 

If you decide to go on with an update,  an automated process will do a backup of your current setup, and then start to update your existing environment and perform stability tests. If anything goes wrong, you will be rolled back to the most recent version, and a support ticket will be generated automatically.

How do I get technical support?

There are two different support options, one for each license type. The Company license includes e-mail support with a guaranteed response time of 24 hours. The Developer license includes personalized phone support with instant response and a guaranteed resolution time of 3 hours.  

What if anything breaks? There’s no one with any technical background on my team, how do we fix it?

Activechat can run unattended for years. 

For your peace of mind please be aware that in the recent 4 years, the public cloud version of Activechat had an uptime of 99.99% despite some massive hacker attacks and high load times.

In the unlikely case that anything goes wrong with your local copy, though, you should notify us and you will get our full assistance in putting it back to work. 

Can you develop feature “X” for me?

Yes, and actually that’s exactly what we’ve been doing for the majority of our customers. Contact us for more details and for a quote.

Posted on Leave a comment

Intents and Insights (and some small talk too)

Intents training

Flip the switch. Keeping every advanced feature that we already have, Activechat is now one of the easiest-to-use platforms for smart natural language bots.

If you’ve ever been confused by the advanced features of our visual chatbot builder, it’s time to relax. With our recent “Intents and Insights” release, your smart AI agent is ready in minutes and keeps improving forever. Watch the video for a short (10 min) demo or keep reading!

Watch the 10-minute demo of Intents and Insights

Intents

The intent is something that your customer wants to achieve. It can be a question, issue description, request, order, or any other action that requires your business to respond. In Activechat, you can define thousands of different intents, and each of them will be performing one of these three actions:

  • Simple response – to provide an instant answer that does not require any further action (like in “What’s your opening times?”)
  • Trigger skill – launch a sophisticated sequence of actions that may include additional questions to customer, accessing your CRM or database, processing data, etc. Fits best for tasks like appointment setting, lead generation, checking order statuses, accessing balance, and so on. 
  • Start live chat – choose this option to handle the conversation to a human agent for complex requests which are difficult to automate.

To define your intents, open “Automation – Intents” in the bot menu. This is where you list phrases that your customers may be using when messaging your business. Once you seed each intent with 5-10 phrases that your customers may use to describe it, the natural language understanding engine will start guessing similar phrases and trigger the intent even if the customer re-phrased it or mistyped.

Intents can be organized into groups and sub-groups. For example, in the banking domain, you may have an “Account actions” group with “Checkings” and “Savings” subgroups for different account types.

👉 Read more about Intents in our manuals.

Small talk

For some bot languages, we’ve introduced a set of “small talk” intents into your agent template. These intents keep the conversation human-like, with phrases like “How are you?”, “Are you a bot?”, “Can you help me?”, “I’m feeling sad”, etc. To edit these intents (or remove completely if you don’t need it), open the “Small talk” category in the intents tree.

Please note that when you start building up your intents, some phrases from the “Small talk” section may be conflicting with phrases that you use in other intents’ definitions. If this happens, consider removing some of your Smalltalk intents.

Insights

Intents are good, but how do you know which phrases your customers use? Most conversational designers will be guessing that or digging into individual chat transcripts message by message. We simplify that process by grouping all messages sent by your customers within a specific time period into “topics”. Each of these topics will contain messages that seem similar to our AI. All that’s left to do is tick some checkboxes and add these phrases to the definition of specific intent.

Go to “Automation – Insights” in the bot menu and choose the source of your Insights. It can be either of:

  • Chat history – for conversations that are already happening on your website (if you have our chat widget installed)
  • Zendesk chat transcripts – to import messages from your Zendesk account
  • Text file – to import messages from plain text files (one message per line)
Just tick the boxes to add new phrases to intents

👉 Read more about Insights in our manuals

These tools, combined, can make the process of building your smart AI agent and automating your routine customer care tasks easy as never before. Just flip the switch in the bot settings to change the default NLP engine from “Dialogflow” to “Intents and Insights”.

If you want to use “Intents and Insights” engine in your existing bot, follow these simple steps:

  1. Go to the “default” skill, delete everything except the “CATCH” block and connect NLP block to the CATCH (don’t mind the error message)
  2. Add the “_default_fallback” skill that will be triggered if none of the intents was detected.
  3. Add the “_start_live_chat” skill for human escalation intent.
  4. Go to bot settings and flip NLP engine from Dialogflow to “Intents and Insights”
  5. Run the bot.
  6. Add any other intents you may need…
  7. Enjoy!

Again, these steps are required only if you’re converting an existing bot. When creating new bots from scratch, you’re good to go instantly!

Posted on Leave a comment

GPT-3 for live chat makes life easier for customer service agents

The vision behind Activechat is to make the most advanced AI technology easily available for customer care applications even if your team has zero technical background. This vision empowers our natural-language integrations, sentiment detection, and other advanced features packed into our visual chatbot builder. But there’s more to it, and we’re happy to introduce our recent integration with OpenAI’s beta of their GPT-3 model – GPT-3 for live chat.

GPT-3 is a mega machine learning model, created by OpenAI, and it can write it’s own op-eds, poems, articles, and even working code. As a result of its humongous size (over 175 billion parameters), GPT-3 can do what no other model can do (well): perform specific tasks without any special tuning. You can ask GPT-3 to be a translator, a programmer, a poet, or a famous author, and it can do it with its user (you) providing fewer than 10 training examples. Damn.

Dale Markowitz

Activechat has partnered with OpenAI team to build something that looks like real magic. Once you describe the context of your business in a plain natural language and provide a couple of example questions and answers that your human live chat agents may encounter in their day-to-day conversations with customers, we can use the power of GPT-3 to provide instant hints to your agents to help them answer almost any question that a customer may have.

Let’s look at some real-life examples of this amazing tech.

Bike shop – default settings

Imagine that you’re the owner of a bike shop selling hundreds of bikes from various manufacturers. Your website has a lot of traffic and you introduce live chat to help your customers make their choice and grow your revenue. After a week of accepting incoming chat requests, you suddenly realize that training your agents so that they can really answer this crazy amount of questions from customers-to-be takes tons of time and is quite costly. You have your knowledge base, but most of your agents feel lost when it comes to answering specific questions, and looking for the correct answer often takes quite a lot of time.

Luckily enough, your live chat solution is powered by Activechat, so you can go to “Settings – Integrations – OpenAI” and describe your business case in plain natural language:

This is a conversation between a website visitor and a smart virtual assistant. The conversations are happening across various pages of the website that is selling bicycles, and virtual assistant can answer all kinds of questions about various bike brands and models and help choose the right one according to description made by the visitor.

That’s all you need to seed the OpenAI’s GPT-3 for live chat

Next, you provide answers to three questions that your customers ask most often:

Q: What’s the difference between a carbon and regular bike?
A: The primary difference between carbon and aluminum comes down to weight and ride quality. Carbon frames are usually a bit lighter than aluminum — up to a pound for mountain frames and up to a half-pound on road frames.

Q: How much does a good bike cost?
A: Road bikes range between $350 and $700, Mountain bikes around $1000, Single-speed bike – $400, Beach cruiser $200-300, Recumbent bike $1000-2000, and Kids’ bike (3-8 yrs) will be $140-200.

Q: How do I service my bike?
A: You should regularly service your bike to ensure it is running efficiently and that there are no worn or damaged components. The more you ride the bike the more frequent you should be servicing it, especially after riding in dirt, sand, mud and in the rain.

Guess what? Your training is complete!

Now your agents can pull the “Show AI hints” tab in their live chat interface, and on every new message from a website visitor, there will be 2-3 ready-made answers suggested by the GPT-3 engine.

GPT-3 for live chat provides instant answer suggestions

Clicking any of these hints will copy the answer to the message window, and your agents can send it immediately or edit it, adding specific links to your product pages or other resources. Based on our research, this can reduce the time needed to find and type the answer by 70-80%!

If you’re not satisfied with what you see, just hit the “Refresh” icon and a new set of hints will appear. These hints are powered by all knowledge that the Internet has (GPT-3 model is trained on Common Crawl data, Wikipedia, and multiple other data sources, including a huge amount of books). This makes suggested answers sound human-like and in most cases, they will be relevant, useful, and valuable to your customers.

AI-powered live chat for mobile phones outlet

Another use case from one of our customers – an online shop selling mobile phones. Again, the problem is quite similar to the bike shop above – customers repeatedly ask questions that require a solid chunk of knowledge from customer service agents. Novice agents keep forwarding these questions to more experienced team members, and instead of taking care of really complex queries, these team members keep wasting their time responding to the same questions again and again.

After they introduced GPT-3 for live chat, their seeding settings would look like this:

GPT-3 settings for mobile phones retailer

And here is an example conversation that was made completely by sending GPT-3 answer suggestions, with zero time required from the human agent:

GPT-3-powered live chat conversation

How to use GPT-3 for live chat?

Currently, OpenAI’s GPT-3 is in a public beta. Activechat partnered with OpenAI team to include these amazing features into our live chat platform, and they are available for all our users on Team and Company plans. Here’s how to jump-start your AI-enabled live chat:

  1. Go to “Settings – Integrations – OpenAI” in any of your bots and type your business description in plain natural language.
  2. Add three questions that are most relevant to conversations happening on your website.
  3. Ask your live chat agents to pull the “Show AI hints” tab below the message editing window.
Accessing OpenAI’s GPT-3 settings in Activechat

Yep, it’s that simple! We can’t wait to hear about your use cases, so please feel free to share your stories of GPT-3 making life of your human live chat agents easier.

Posted on Leave a comment

Building an advanced restaurant delivery chatbot with Google Sheets integration

AC tips - building advanced restaurant chatbot

Building an advanced restaurant delivery chatbot with Google Sheets integration

Highly customizable chatbot in less than 2 hours

By ANDREW GANIN

  •  Slide Item 4
Device Slider
This complete walk-through will teach you how to use Google Sheets integration in your chatbots. See how easy it is to build highly customizable chatbots for complex use cases with the power of Activechat. 

Table of content

Setting the goals

Let’s start with complete list of features for this simple chatbot. Since it’s not a production-ready solution, but rather an illustration of Google Sheets integration mechanics, there will definitely be some shortcuts. Feel free to use the template for your own design!

We’ll use a simple Google Sheets spreadsheet to store chatbot data. One sheet will contain complete list of products that are available for delivery, and another will hold orders from chatbot users. 

Click to see actual data here 👉 Restaurant delivery chatbot Google Sheets template

You can test the sample bot here 👉 Activechat Pizza Bot v.2

It’s supposed that there will be a bot admin, receiving new delivery orders, sending couriers and marking orders as delivered.

Here is the complete list of features for this simple chatbot:

  • Display a gallery of products from specific category based on certain search criteria
  • Display detailed information about specific products
  • Take delivery orders, send order notifications to admin’s email and store orders in the Google Sheets document
  • Allow users to check the status of their order and leave comments for couriers

Designing chatbot skills

designing chatbot skills

This chatbot is very simple, so it will have just a few simple skills. The complete development process should  take around an hour only.

First, we’ll have the “start” skill to greet the user and offer him/her some options. 

Next, we’ll have a “menu” skill, displaying the gallery of products that fit user’s search criteria. 

To process delivery orders, we’ll need the “order” skill. 

Another skill will be used to check the status of user’s order and add comments to orders that are not yet delivered. Let’s call it “status”.

These skills will be inter-connected with events, and “default” skill will trigger other skills based on the keywords detected in user’s message.


Preparing the data

Google Spreadsheet for restaurant delivery chatbot
Google sheet with restaurant menu for the chatbot (click to enlarge)

Our chatbot will be extremely flexible in terms of product catalogue. We’ll store everything in a Google spreadsheet, one product per row, with columns for:

  • Product ID
  • Product category (used for filtering)
  • Product name
  • Product description
  • Product price
  • Product weight
  • Link to product image
  • Product availability (a simple Yes/No)

Chatbot admin will be able to add more products and product categories easily, and disable product availability with a simple change of “Yes” to “No”  in a spreadsheet cell.

Google sheet with orders from delivery chatbot
Google Sheet with the list of chatbot orders (click to enlarge)

Delivery orders will be stored in another sheet of the same spreadsheet. For each order (one per line) we’ll put there:

  • Messenger ID of chatbot user
  • His (her) name, e-mail and phone number
  • Order date and time
  • Order cost
  • Name of the product ordered
  • Delivery address
  • Order status (“waiting”, “preparing”, “cooking”, “packing”, “delivering”, “done”, edited by admin)
  •  Estimated delivery time (edited by admin)
  • Link to product image (we’ll use this in the next chapter to display the gallery of previous orders for specific user)
  • User’s comments for this order (like, address details, extra add-ons etc).

Starting the conversation

Our “start” skill will be very simple. It will display “Choose something from our menu” message and then it will listen to user’s choice, displaying two quick replies – “pizza” and “salad”. Once user clicks one of these replies (or types anything else), “start” skill will continue to the SEND block, triggering “menu2” skill to display the menu.

"Start" chatbot skill

Instead of clicking “pizza” or “salad” quick replies, user can type something else – for example “dessert”. If there’s anything in “desert” category in your Google Sheet, then these products will be displayed. LISTEN block is saving user’s input to the $search bot attribute, which is used in the next skill.


Now comes the fun part. We have product category in the $search attribute, and we want to display a gallery of products from our Google Sheet that relate to that category. Something that would require advanced coding in any other chatbot platform can be done in Activechat with just a couple of blocks. 

ℹ️ When working with dynamic galleries you should keep in mind Facebook’s limitations on gallery size – it’s limited to 10 scrollable cards. To make chatbot conversation flexible and able to display unlimited number of products we’ll use a simple navigation trick. 

GS-GALLERY block will do a search on your Google Sheet and display a gallery of cards that fit the search criteria. Let’s look into this in more detail. 

Dynamic Google Sheets gallery
Dynamic Google Sheets gallery (click to enlarge)

Once you connect your Activechat to your Google Account (go to Settings – Integrations – Google to do this), you can use GS-GALLERY block to build dynamic galleries from any spreadsheet. The block in the example above contains three self-explanatory parts:

  1. Set search criteria. In this example we’ll build the gallery from rows where column B (product category) is equal to $search attribute value (remember – we got this value from the user in our “start” skill?) and column H (product availability) is equal to “Yes” (means, the product is available for delivery).
  2. Build gallery content. We’ll use column C (product title) as Title for each gallery card, column D (product description) as card’s Subtitle and column G (product image) as image URL. 
  3. Add extra attributes to each card. We’ll add value from column E (product price) to “price” gallery attribute and column F (product weight) as “weight” gallery attribute. Later, when user clicks any of the gallery buttons, these values will be available as $_selected_gallery_price and $_selected_gallery_weight bot attributes (note the naming convention – we just add $_selected_gallery_ to the attribute name). 
To each of these cards we’ll add two buttons – one to order the displayed product (it will trigger the “order” skill) and another to display detailed information about the product.
Adding buttons to dynamic Google Sheets galleries
Adding buttons to dynamic Google Sheets galleries (click to enlarge)

These buttons will be added to each card in the gallery. Once the user clicks any of these buttons, chatbot will continue to the connected block, while setting a number of attributes to values defined by the card content:

  • $_selected_gallery_title will contain the “Title” field of the card
  • $_selected_gallery_subtitle will contain the “Subtitle” field
  • $_selected_gallery_image will contain the image link for that card
  • $_selected_gallery_<attribute> will contain any extra card attributes that you added in the “Attributes” part of GS-SEARCH

This gives your chatbot the ability to know which card was clicked, and you can use that data in the conversation that follows.

For example, when user clicks “Details” button, we want to display detailed info about the selected product. Note the use of dynamic gallery attributes in TEXT and IMAGE blocks that are connected to this button:

Using dynamic gallery attributes
Using dynamic gallery attributes (click to enlarge)

TEXT block that displays detailed product description from $_selected_gallery_subtitle contains two buttons. “Show more” will go back to the GS-GALLERY block, displaying the same gallery again, and “New search” will ask user for new search criteria.

Note the use of card attributes to display extra data (not available as card Title or Subtitle) in the detailed description. This allows you to store extra parameters with each gallery card, and these card-specific parameters can be used in the conversation when user clicks the card in the gallery:


Detailed info from card attributes
Detailed info from card attributes and the "New search" button (click to enlarge)

Navigating multiple gallery pages

Let’s see what happens if there’s more than 10 rows in your spreadsheet that fit GS-SEARCH block search criteria. Once this block is executed (and gallery built) you will have two system attributes to check the number of search results:

  • $_gs_total_results will contain total number of spreadsheet rows that fit your search criteria
  • $_gs_total_pages will contain the number of results divided by 10 (efficiently, the number of 10-card galleries required to display all search results)
We can check the value of $_gs_total_pages to see if there’s more than one gallery page and build a simple page navigation mechanics with quick replies:
Chatbot navigation for multiple pages in gallery
Chatbot navigation for multiple pages in gallery (click to enlarge)

What’s going on here? 

Immediately after we display the dynamic gallery with products, we check the value of $_gs_total_pages with SWITCH block. If it’s less than 2 (i.e. we have only one page of search results) we do nothing (notice that there’s no block connected to that exit in SWITCH). But if it’s 2 or more, we proceed to another SWITCH with three different options:

  • if current page number (we store it in $page attribute and set to 1 before displaying the gallery) is 1, we show “Use buttons to navigate” message and display a single quick reply for “Next page”
  • if current page is greater than 1 and less than $_gs_total_pages (i.e. the maximum page number possible for that search), we display two quick replies for navigation – “Previous page” and “Next page”
  • and, finally, if current page is equal to the maximum page number we display just a single quick reply – “Previous page”
Once the user clicks “Previous page” or “Next page” quick reply, we decrease or increase the current value of $page attribute by 1 and go back to GS-GALLERY block to display search results again, starting from the specified page:
Displaying specific page in dynamic gallery
Displaying specific page in dynamic gallery (click to enlarge)

Receiving delivery orders

What happens when chatbot users click the “Order” button in our dynamic gallery or in detailed product view? Let’s see how the bot is sending these orders to the Google spreadsheet. 

Collecting lead data with the chatbot
Collecting lead data with the chatbot (click to enlarge)

This flow is very simple. The bot is asking user a couple of questions like email, phone number and delivery address, and then sends this data to bot admin with the LEAD block and stores it to Google Sheets with GS-UPDATE block. When this is done, the bot displays “You’re all set” confirmation message and two quick replies to check pizzas or salads again.

LEAD block is combining user’s details and order data into a neat email message that is sent automatically to admin’s address.

Sending lead data to bot admin
Sending lead data to bot admin (click to enlarge)

After this, we proceed to GS-UPDATE block to store the order into Google Sheets. 

Storing data into Google Sheets with GS-UPDATE
Storing data into Google Sheets with GS-UPDATE (click to enlarge)

Notice – I’m setting “Insert” parameter to “true” and use “2” as the row number. It will instruct Activechat to add new rows above row 2, so that the latest orders are always on top of our spreadsheet (row 1 is reserved for column headers).

Cell values are obtained from attributes that the chatbot already has:

  • “User ID” (column A) – from $_id system attribute
  • “User name” (column B) – from  $_first_name and $_last_name system attributes
  • “E-mail” and “Phone” (columns C and D) – from lead data that we collected with LISTEN blocks ($user_email and $user_phone)
  •  “Order date” (column E) – from $_year, $_month, $_date system attributes (current date)
  • “Order time” (column F) – from $_hour, $_minute, $_second system attributes (current time)
  • “Order price”, “Order content” (columns G, H) – from $_selected_gallery_price and $_selected_gallery_title attributes that were set automatically when user clicked a button in the dynamic gallery
  • “Delivery address” (column I) – from $user_address attribute collected by LISTEN block 
  • “Order status” (column J) – set by default to “received”. This can be changed later in the Google Sheets document by bot admin and updated statuses will be displayed to the user.
  • “Delivery time” (column K) – set to “estimating..” by the bot. Once admin reviews the order, he/she can change the value in that cell to be displayed to user on every status check.
  • “Image” (column L) – from $_selected_gallery_image attribute set when user clicked a button in the dynamic gallery. This column is not used in the current version of the bot, but we’ll be using it later to display the gallery of previous orders
  • “Comment” – empty, the bot will be updating that column later, in the “status” skill.

Checking order status

Let’s make it possible for our chatbot users to check the current status of their order (remember we have “Status” column in our Google Sheet which is supposed to be updated by bot administrator?). 

The logic will be quite simple: once the user requests the status check, we’ll find a row in the Google Sheet with his (her) Messenger ID in column A and anything except “done” in column J (“Order status”) and display the status. It is supposed that at every moment there can be only one (or none at all) order in any other status – this can cause problems if user is placing multiple orders before admin changes their status to “done”. You can fix it with a simple check before accepting new order – just use a similar GS-SEARCH to check for open orders placed by the same user. Adding this check will be your homework assignment! 😁   

Searching for data in Google Sheets
Searching for data in Google Sheets (click to enlarge)

When this skill is triggered, the bot sends “Hold on, checking my records” message first and then we use GS-SEARCH to find a spreadsheet row where column A (user ID) is equal to the current user’s Messenger ID (it’s available in the $_id system attribute).

After GS-SEARCH is executed, we’ll check the value of $_gs_result system attribute. If it contains “This value was not found” (actually, I’m checking only for “not found”), it means that there are no active orders for that customer, and the bot is sending “It looks like there are no active orders from you currently”.

But if the value of $_gs_result is “Ok” – it means that the row was found, and we can update user with information from that row. So, the bot proceeds to the TEXT block:

Using values from Google Sheets in the TEXT block
Using values from Google Sheets in the TEXT block (click to enlarge)

This block is displaying data from Google Sheets row that the bot have found on the previous step. Notice the use of $_gs_<column> attributes – they are populated automatically after every successful search and contain values from every column in that row. That means that column A value will be available as $_gs_a, column B – as $_gs_b etc.

Adding comments to orders

You may have noticed “Add comment” button in the TEXT block that displays order status. I’ve added it to allow chatbot users to leave comments for their orders (for example, how to get to the building, adding extras to the order or anything else). 

When user clicks that button the bot says ” Sure, just type and send” and LISTENs to user’s input, saving it to the $order_comment attribute. Once the user send his/her comment, the bot proceeds to GS-UPDATE block, adding that comment to column M in our spreadsheet (and overwriting previous value in that column, if any).

Updating column value with GS-UPDATE block
Updating column value with GS-UPDATE block (click to enlarge)

We’re using the value of $_gs_row attribute to specify which row in the spreadsheet should be updated. This attribute always contains row number of the last successful execution of GS-SEARCH block.

Notice that “Insert” option in the GS-UPDATE block editor is set to “false”. This instructs Activechat to update the existing spreadsheet row instead of adding new one. on top When we were accepting orders above, we set this parameter to “true” so that new orders would be piled on top of your spreadsheet.

Triggering skills with keywords

How does the user triggers these skills and how does the bot know which skill to use? 

To make it possible we’ve introduced a very simple keyword detection in the “default” skill. For a quick recap – this skill will be triggered every time when user is sending message to your chatbot and you do not have any LISTEN block actively listening to user’s response (i.e. the bot is in “idle” mode).

Keyword detection with the "default" skill
Keyword detection with the "default" skill (click to enlarge)

We’re using SWITCH block to check the value of $_last_user_input system attribute (it always contains the last message that user sent to the chatbot).

If this attribute contains “pizza” or “salad” or “deliver” (the user asked something like “how to order delivery?” or “I want pizza” etc), the bot will trigger “start” skill again (since the ordering starts in that skill, with “Choose something from our menu” message).

If $_last_user_input contains words like “order” or “where” or “status” (for example, user is asking “Where is my order?” or “What’s my order status?”), the bot will trigger “status” skill (see above).

Please keep in mind that SWITCH block is evaluating conditions top to bottom, in the order they appear in the block editor. So, if you’re checking for “deliver” keyword first (to answer questions like “How do you deliver?”) and then for “delivery” keyword (to answer “Where is my delivery?”) you should be aware that both phrases will trigger the first condition because “delivery” contains “deliver” as sub-string. 

Conclusion

It looks like we’ve managed to build quite complex chatbot which is almost ready to be used in real-life application. Bot admin will be able to add new products and categories easily, adding new rows to Google spreadsheet. Admin will receive orders, update statuses and estimated delivery times and mark orders as “done” on delivery, and chatbot users will be able to browse products, make orders, check order statuses and leave comments.

It took us less than an hour to build that chatbot, and it’s just 5 skills with 58 blocks in total. Imagine doing something similar with Manychat or Chatfuel! 

You can test the sample bot here 👉 Activechat Pizza Bot v.2

You can experiment, customize and improve that bot from the template – look for “Activechat Pizza Bot v.2” in our chatbot templates

Chatbot templates in Activechat

There are many improvements to make, of course. Throwing in a couple of extra blocks will add the ability to send instant in-Messenger notifications to bot admins or arrange direct communication between customers and delivery couriers right in the chatbot – we’ll be covering these and many other cool features of Activechat in the next walk-through sessions like this!

Did you like it? Just let me know in the comments on our Facebook community

Did you find this useful? Please share with other bot builders!

CONTACT US

© 2018-2020 Activechat, Inc.

existing users

Posted on Leave a comment

Chatbot buttons vs quick replies

Chatbot buttons vs quick replies

Two basic approaches to chatbot navigation

By ANDREW GANIN

A lot of people seem to be confused by two chatbot interaction elements that are available on every messaging platform – buttons vs quick replies. 
buttons vs quick replies
Example of e-commerce chatbot conversation using both buttons and quick replies

Chatbot navigation

Majority of chatbots built with modern low-code chatbot platforms are based on decision trees. Natural language understanding chatbots are still quite difficult to build and train.

Decision tree chatbots are using two basic types of interactive elements – buttons and quick replies – to navigate through various bot features and conversation parts.

Let’s look into details to see how these elements can be used!


Chatbot buttons

On most messengers (like Facebook Messenger or Telegram) buttons can be attached to specific messages that the chatbot is sending to users – texts, images and galleries (carousels). In the example above there are three buttons attached to “Pick an option below to get going” message in the CNN chatbot

Buttons are displayed as a small menu and are usually limited to 3 options. Maximum length of the button name (the text that is displayed on the button) is 20 characters on Facebook Messenger. 

A lot of chatbot designers are adding smileys to button names to make it more visually appealing and easy to understand.

Depending on the chatbot design, buttons can trigger specific parts in the chatbot flow (send events or postbacks), open website pages or initiate phone calls on mobile devices. 


Quick replies

Quick replies (or chips as Google calls it) are pre-defined responses that chatbots offer to their users. They are displayed as bubbles next to the message typing area, and users can click one of the replies instead of typing it in. 

Some messenger platforms like Facebook Messenger or Telegram allow bots to pre-populate quick replies with user-specific data like email or phone number, so that user can click this reply and share the information with the chatbot immediately, no need to type it manually. 

You can use up to 13 quick replies on Facebook Messenger, but usually it makes sense to limit the number to 3-5. It’s plain common sense and good conversational design – trying to keep things as simple as possible to make interaction with your chatbot easy.


Using buttons and quick replies

Example of buttons in the chatbot
Example of chatbot buttons (click to enlarge)

On Activechat visual chatbot builder you can add buttons to blocks from TALK category (TEXT, IMAGE and GALLERY) and also to e-commerce blocks (automated category and product galleries).

Example above shows a simple pizza chatbot that greets the user and asks “What would you like to order?”, offering two connection buttons for pizzas or salads. When the user clicks one of these buttons, the flow will continue from the block that is connected to it.

Please note that there’s no LISTEN block connected to the TEXT block with buttons. It means that if user types anything instead of clicking one of these buttons, the chatbot’s “default” skill will be triggered – use some type of keyword detection there to be able to respond to that message.

There are four common button types:

  • Connection button
  • Event button
  • URL button
  • Phone call button

Connection and event buttons are used to branch the conversation according to user’s choice. URL button will open a webview with the web page at the specified address, and phone call button will initiate a phone call where it’s supported (mostly on mobile devices).  

Example use of quick replies in the chatbot
Example of chatbot quick replies (click to enlarge)

This example shows how you can achieve exactly the same functionality with quick replies instead of buttons. Please note that now we’re using LISTEN block. It means that after “What would you like to order?” message your chatbot will be actively listening to user’s response, showing two quick reply bubbles for pre-defined options. 

If user clicks one of these quick replies (or exactly types the text on the quick reply, i.e. “pizza” or “salad”), the bot will save the response text to $choice attribute (as indicated in the LISTEN block editor) and the flow will continue to the block that is connected to that reply. If user types anything else, the flow will continue from the bottom of LISTEN block. We’ve connected another message there, saying “Please make a choice!” and looping back to the same LISTEN block, displaying the same two quick replies.

Feel free to reproduce these skills in your own Messenger chatbot and check how it works.


Connections vs event buttons

Connection buttons are used… well, to connect other blocks. It’s ok to do so in simple chatbot skills, where different conversation branches can be implemented in just a couple of extra blocks.

If your button should start a complex conversation, it makes sense to implement it as a separate skill, triggered by event, and use event button to start it.  

Example of event (postback) buttons
Example of event (postback) buttons (click to enlarge)

In the example above we’re using two event buttons, one to trigger “manuals” event (and thus start a “/manuals” skill) and another to trigger “faq” event. 

When using this type of buttons, you should have CATCH block somewhere in one of your chatbot skills, listening to these events.

Common mistakes

Good conversational design is not easy, and sometimes chatbot developers mess up with buttons and quick replies in the variety of ways. Let’s look into most common mistakes (try to avoid it!)


1. Nothing is connected to the button

Example of missing button connection

Guess why connection button is marked with yellow in the example above? It’s a warning that there are no blocks connected to that button, so if your chatbot user clicks it in the conversation nothing will happen.  


2. No matching CATCH block for event button

event buttons
Example of missing button connection

If you’re using “event” type buttons, make sure that somewhere in your chatbot there is a CATCH block listening to that event. Otherwise nothing will happen when user clicks on these buttons.


Buttons and quick replies use cases

To make a long story short, here are some recommendations on what type of interaction to use in various situations:

  • If you need to save user’s choice as bot attribute, use LISTEN block and quick replies
  • If your conversation is simple, use connection type buttons
  • If you need to trigger complex bot skills, use event type buttons
  • If you need to get user’s email or phone number, quick replies are the only option


Do you find this useful? Click to share with other bot builders!

CONTACT US

© 2018-2020 Activechat, Inc.

existing users

Posted on

Chatfuel Or Manychat alternative?

Ok, yes, this is a promo. But in the last weeks, I’ve been talking to lots of our users and many of them asked for an explanation of our Bot Architect core features and best practices for designing bots that bring value. So, here’s a brief update on what we already have in the platform and what we plan to build soon. 

Visual chatbot builder

This is something that Manychat did much better than Chatfuel. But then we took it even further with more block types and the concept of bot skills. Bot events let you pass control between various skills effortlessly, providing great user experience.

Dialogflow direct integration

No need to use JSON APIs or external services like Janis. We connect your existing Dialogflow agent through developer token and you can use your intents to drive bot skills and trigger blocks in visual flow builder.

E-commerce chatbots

Some of you have already used our Integrator tool to get product galleries and category listings from your WooCommerce store in Chatfuel bots. In Bot Architect you can have those as native building blocks for your conversation, making bot ordering and e-commerce even better.Learn more

Bot variables and data

Do extensive math and take decisions based on your calculations. Fetch data from external integrations through JSON API. We’re still working on adding more powerful data processing (like introducing arrays and objects), but you already can do quite a lot!Learn more

Timers and delays

Both Chatfuel and Manychat are great in sending drip campaigns, but building these campaigns for the right conversational interaction can be an issue. We solve this with timers – now any skill can be triggered with a set delay (or even at a set date/time) and have any complexity that you need.Learn more

More chatbot features

We’ve just started our journey with Bot Architect, and we do our best to build a great tool for every chatbot developer. We’re constantly adding nice features and new integrations, and we have a great support team to help you with onboarding and getting most from your experience!

Visual Chatbot Builder

Stop building bots. Build conversations instead! It’s really easy. Pull the block from the toolbar, then pull a couple more, connect them with lines and season with some data processing and integrations – Voila! Your bot is ready and you can test it immediately. But when your users start to communicate, things tend to get a bit more complicated. “Hey, there’s a dead-end here, we need to add some quick replies”, “Look, these two intents can get mixed”, “Ok, we need one more button to make a reservation” – your bot can quickly turn into something unmanageable, and your overall business objectives fade behind blocks, buttons, replies, and integrations. We’ve decided to put the conversational design on top, so building bots in Architect is really easy and straightforward. Instead of managing the bot as a whole, you can teach him some small skills – short conversation flows that fulfill a specific action or provide a user with some specific value. These flows are then triggered by events – and you can use almost anything as an event. Some examples are: (1) user pressed a button – that’s an event, (2) user said something that was recognized as natural language intent – that’s an event too, (3) timer was triggered – event again, and so on and so forth. Here’s an example of a skill that is handling subscriptions and unsubscriptions to bot updates.

The conversation builder is based on the concept of “events” that drive bot interaction with end-users.

Simple skill to control bot subscriptions and unsubscribes.

Note how “Subscribe me!” and “Unsubscribe!” buttons are sending events that are being caught by CATCH blocks to trigger certain mini-flows. Good news is that once you’ve defined flow for a certain event, you can trigger it from anywhere in the bot by sending this event with a SEND block – for example, if you have “Unsubscribe” button hidden deep in another skill or connected to NLP intent (more on that in a moment). Using the flow builder is quite straightforward, and we have a short description of block types for your reference, feel free to check it.

Dialogflow direct integration

Understand natural language input from bot usersWe started Activechat.ai as a service to help integrate Chatfuel to Dialogflow for better natural language understanding. Lots of people are using it now, and in Bot Architect we moved that integration to the next level. Now you can have your Dialogflow agent connected to your bot just by pasting developer access token, and all your intents will be immediately available in your bot as events, and entities and contexts – as variables. Even more – we’ll create skills for each of your intents, and all you’ll have to do is add some content to that skills to make your Dialogflow bot shine. There are two approaches to chatbot development. One is decision tree based – this is used by Chatfuel, Manychat and other similar platforms where users can control conversation by pressing buttons and providing quick replies. Another is free-form natural language interaction and is used by platforms like Dialogflow, Wit.ai etc. We managed to combine best of both worlds, so that in Activechat Bot Architect you can easily sketch decision-based conversation flow and then enrich it with natural language intents. The reason for this is that we firmly believe in the future of natural language interaction between computers and humans, and we also realize how difficult can complex bot design in Dialogflow be. Integrations, timed events and data processing are pain in the neck in Dialogflow, and hopefully we can make developer’s life a bit more easy here. 

Janis.ai is great. But we are better in contexts and entities, and you don’t have to pay extra!

Dialogflow intents as events in Bot Architect

All you have to do to extract intents from user’s freeform input is pass that input to NLP block. Here’s a simple example with “default” event that is triggered every time your user sends message to the bot. $_last_user_input is a system variable, storing last message received from your user.

Sending user input to Dialogflow to extract intents. Note incoming contexts: “ordering” and “usa”.

Working with entities is easy too – when any of your Dialogflow NLP intents triggers an event inside your bot, these intent’s entities are being passed as bot variables $_nlp_entity_<name> and you can use them in your bot logic. Need contexts? Sure – just check $_nlp_contexts for the list of outgoing contexts from Dialogflow intent or set incoming contexts in NLP block settings. Read more about NLP in Activechat.

Native e-commerce chatbots integration

Sell products and services directly in the botHalf of requests that we have for chatbot development is for e-commerce shops. If you are using Chatfuel or Manychat, adding product gallery requires lots of manual work and the updates are hard to implement. Searching through your products also requires manual integration and extensive use of JSON API – but now it’s in the past due to direct e-commerce integration that you can have in our Bot Architect. Currently we support WooCommerce CMS, and 3Dcart and Shopify are on the way. We have two two types of blocks for e-commerce – CATEGORIES and PRODUCTS. These are automatically populated with content from your CMS and do not require manual updates or complex searches. CATEGORIES block will display a list of categories (or sub-categories) in your shop as native Messenger gallery, and PRODUCTS will do the same to products in a certain category. 

Now you can have product gallery or build categories tree in a click of a mouse!

E-commerce blocks display products and categories from your online store

You can customize these blocks with buttons that will trigger other blocks or skills. For example, “Order now” button can lead to a “Add to cart” skill, and “Show similar” will trigger a skill showing more products that fit certain search criteria. Here’s how it will look in your chatbot conversation – and you can design a great chatbot shopping experience in just a couple of minutes!

Your complete online shop in a chatbot

Working with data and variables

Process user’s input and make decisionsAny chatbot is only as good as the value that it’s providing to the end users. And to provide that value it’s often necessary to do some numbers crunching or solve some other programming tasks. We simplify that by providing visual tools for data processing and manipulating. Currently we support only simple variables, and advanced data processing with arrays and objects is already in the works. Need more processing power? Just use our external JSON API tool and integrate with your own script running at your premises. You can store almost any data that you obtain from chatbot user in bot variables. These variables can be used to manipulate that data (for example, do some maths) or make decisions in the conversation flow. Some examples are below.

Complex programming made simple and visual – with no developer background required

Divide $number by 3 and check ranges
Check if user input contains “yes” or “no”

System variables are used to access certain data about your bot users or events, and here are some of them. You can find complete list in our manuals.

$_first_name – user’s first name

$_last_name – user’s last name

$_locale – user’s locale

$_timezone – user’s timezone

$_random – random value (0..1)

$_year – current year

$_month – current month (1..12)

$_date – current date (1..31)

$_day – current day (1..7)JSON API plugin can be used to fetch data from external sources. Just put external script address and parameters, and get values that the script sends you back in bot variables. 

Call external JSON APIs when necessary

Timers and delays

Send drip campaigns or just ping silent usersWorst thing that can happen to a chatbot is stalled conversation. Bots that bring value™ should be engaging and entertaining, and if the user is stuck somewhere in the flow there should be a way to re-engage her – that’s good both for the user and for your business goals. Sending mass broadcasts manually is time-consuming and can look spammy, but having a pre-designed schedule for bot interactions is a great tool to build long-term relationship with your customer. In Activechat’s Bot Architect you have three types of TIMER blocks. One is for ever-green timers that send events at regular intervals (be it minutes, days or months). You can CATCH these events to trigger certain skills within your bot, feeding fresh content to your users. Another is “WAIT FOR” block – it’s used to pause a flow for a certain amount of time, for example to check if the user has paid for her order in E-commerce shop. And third block is “WAIT UNTIL” – it can be used to wait until certain time or date. This one is great for time-bound announcements, product updates etc.

Remind your users to complete their purchases or drip content to engage and entertain them

Simple skill to check for order payment after 3 hours
Example of drip campaign that will be sent every 2 days with an option to stop it

Don’t forget to pay attention to conversational design – having powerful instruments like the ones that you have in Activechat Bot Architect can lead to unnecessary conflicts. Imagine two timers working independently, for example, or a single event being CAUGHT in multiple skills.

Do you want more?

We have some nice extras

Multiple communication channels

Currently Bot Architect supports Facebook Messenger, Telegram and Twilio (SMS) integrations. Viber, WhatsApp and Slack are in the works, and we’ll be adding Amazon Alexa, Google Home, Intercom and site chat widget soon!  

Mass broadcasts

Schedule a mass broadcast and trigger specific bot skill at a set time or immediately for all users in your chatbot.  

Courtesy waiting time

Sometimes bot users send message to your bot and then immediately start typing again. For example:

Bot: Hi, how can I help you?
User: Hi! Are you online?
User: I’d like to make a reservation…
Bot: There is no help for “Are you online”, sorry – FAIL!

In Bot Architect you can set delay time in LISTEN block, and your bot will wait for a couple of seconds to check if the user starts typing again. If she does – the bot will wait until another message is received and concatenate all user input in one long message to process.