Chatbot buttons vs quick replies
Two basic approaches to chatbot navigation

By ANDREW GANIN

Chatbot navigation
Majority of chatbots built with modern low-code chatbot platforms are based on decision trees. Natural language understanding chatbots are still quite difficult to build and train.
Decision tree chatbots are using two basic types of interactive elements – buttons and quick replies – to navigate through various bot features and conversation parts.
Let’s look into details to see how these elements can be used!
Chatbot buttons

On most messengers (like Facebook Messenger or Telegram) buttons can be attached to specific messages that the chatbot is sending to users – texts, images and galleries (carousels). In the example above there are three buttons attached to “Pick an option below to get going” message in the CNN chatbot.
Buttons are displayed as a small menu and are usually limited to 3 options. Maximum length of the button name (the text that is displayed on the button) is 20 characters on Facebook Messenger.
A lot of chatbot designers are adding smileys to button names to make it more visually appealing and easy to understand.
Depending on the chatbot design, buttons can trigger specific parts in the chatbot flow (send events or postbacks), open website pages or initiate phone calls on mobile devices.
Quick replies

Quick replies (or chips as Google calls it) are pre-defined responses that chatbots offer to their users. They are displayed as bubbles next to the message typing area, and users can click one of the replies instead of typing it in.
Some messenger platforms like Facebook Messenger or Telegram allow bots to pre-populate quick replies with user-specific data like email or phone number, so that user can click this reply and share the information with the chatbot immediately, no need to type it manually.
You can use up to 13 quick replies on Facebook Messenger, but usually it makes sense to limit the number to 3-5. It’s plain common sense and good conversational design – trying to keep things as simple as possible to make interaction with your chatbot easy.
Using buttons and quick replies
On Activechat visual chatbot builder you can add buttons to blocks from TALK category (TEXT, IMAGE and GALLERY) and also to e-commerce blocks (automated category and product galleries).
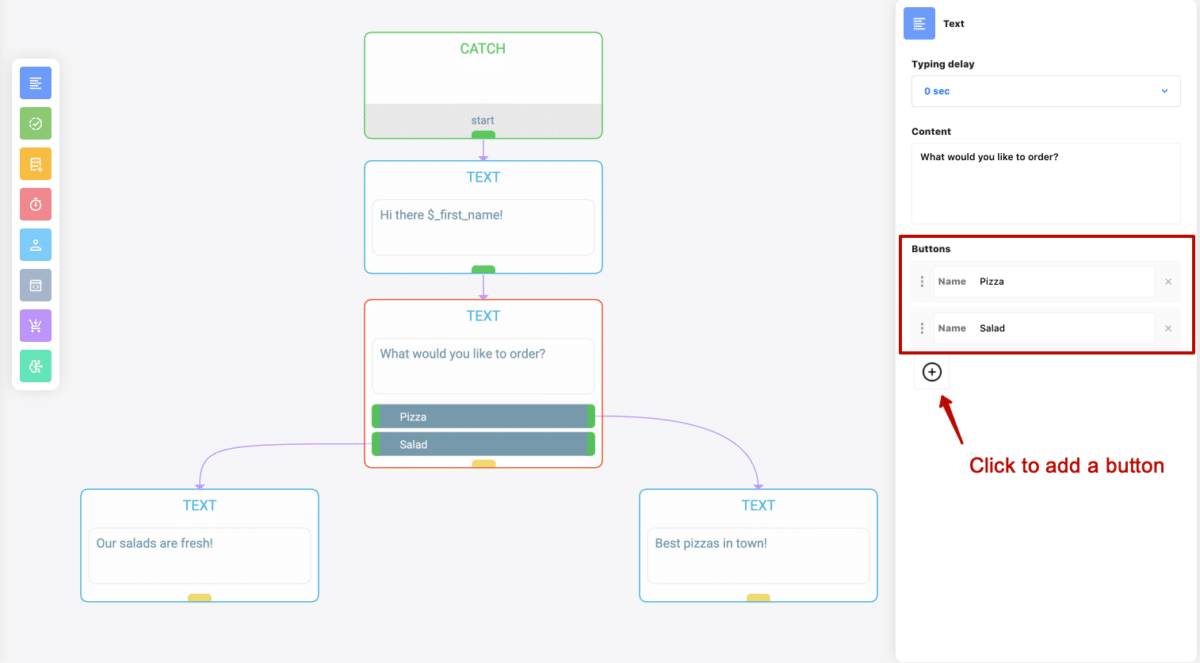
Example above shows a simple pizza chatbot that greets the user and asks “What would you like to order?”, offering two connection buttons for pizzas or salads. When the user clicks one of these buttons, the flow will continue from the block that is connected to it.
Please note that there’s no LISTEN block connected to the TEXT block with buttons. It means that if user types anything instead of clicking one of these buttons, the chatbot’s “default” skill will be triggered – use some type of keyword detection there to be able to respond to that message.
There are four common button types:
- Connection button
- Event button
- URL button
- Phone call button
Connection and event buttons are used to branch the conversation according to user’s choice. URL button will open a webview with the web page at the specified address, and phone call button will initiate a phone call where it’s supported (mostly on mobile devices).
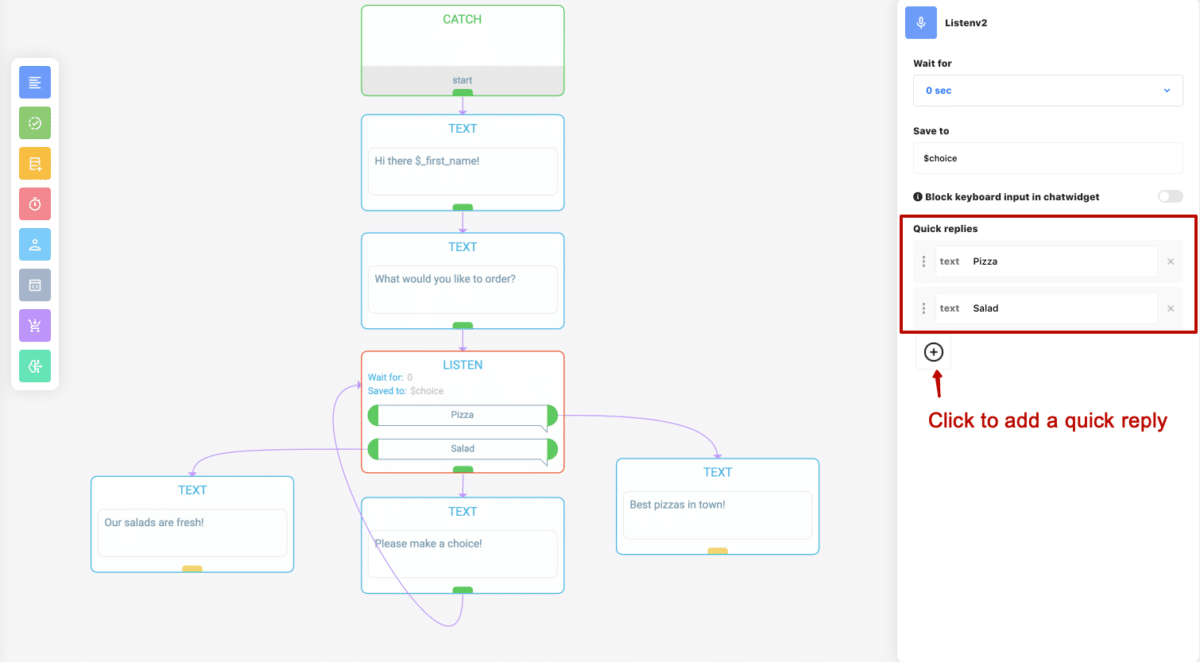
This example shows how you can achieve exactly the same functionality with quick replies instead of buttons. Please note that now we’re using LISTEN block. It means that after “What would you like to order?” message your chatbot will be actively listening to user’s response, showing two quick reply bubbles for pre-defined options.
If user clicks one of these quick replies (or exactly types the text on the quick reply, i.e. “pizza” or “salad”), the bot will save the response text to $choice attribute (as indicated in the LISTEN block editor) and the flow will continue to the block that is connected to that reply. If user types anything else, the flow will continue from the bottom of LISTEN block. We’ve connected another message there, saying “Please make a choice!” and looping back to the same LISTEN block, displaying the same two quick replies.
Feel free to reproduce these skills in your own Messenger chatbot and check how it works.
Connections vs event buttons
Connection buttons are used… well, to connect other blocks. It’s ok to do so in simple chatbot skills, where different conversation branches can be implemented in just a couple of extra blocks.
If your button should start a complex conversation, it makes sense to implement it as a separate skill, triggered by event, and use event button to start it.
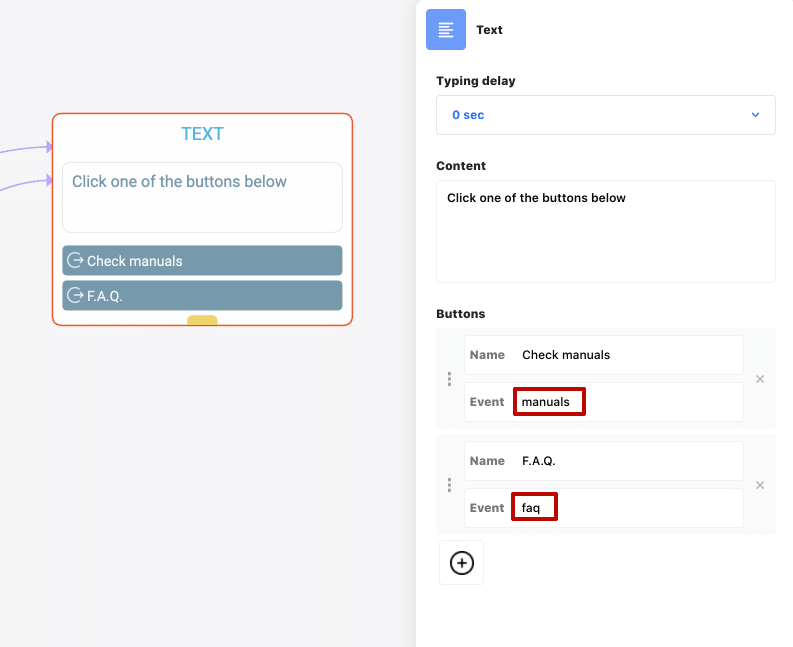
In the example above we’re using two event buttons, one to trigger “manuals” event (and thus start a “/manuals” skill) and another to trigger “faq” event.
When using this type of buttons, you should have CATCH block somewhere in one of your chatbot skills, listening to these events.
Common mistakes
Good conversational design is not easy, and sometimes chatbot developers mess up with buttons and quick replies in the variety of ways. Let’s look into most common mistakes (try to avoid it!)
1. Nothing is connected to the button
Guess why connection button is marked with yellow in the example above? It’s a warning that there are no blocks connected to that button, so if your chatbot user clicks it in the conversation nothing will happen.
2. No matching CATCH block for event button
If you’re using “event” type buttons, make sure that somewhere in your chatbot there is a CATCH block listening to that event. Otherwise nothing will happen when user clicks on these buttons.
Buttons and quick replies use cases
To make a long story short, here are some recommendations on what type of interaction to use in various situations:
- If you need to save user’s choice as bot attribute, use LISTEN block and quick replies
- If your conversation is simple, use connection type buttons
- If you need to trigger complex bot skills, use event type buttons
- If you need to get user’s email or phone number, quick replies are the only option
Do you find this useful? Click to share with other bot builders!
CONTACT US
- 888-370-4802
- ask@activechat.ai
- 1013 Centre Road
Wilmington, DE 19805
© 2018-2020 Activechat, Inc.


