
Highly customizable chatbot in less than 2 hours


Let’s start with complete list of features for this simple chatbot. Since it’s not a production-ready solution, but rather an illustration of Google Sheets integration mechanics, there will definitely be some shortcuts. Feel free to use the template for your own design!
We’ll use a simple Google Sheets spreadsheet to store chatbot data. One sheet will contain complete list of products that are available for delivery, and another will hold orders from chatbot users.
Click to see actual data here 👉 Restaurant delivery chatbot Google Sheets template
You can test the sample bot here 👉 Activechat Pizza Bot v.2
It’s supposed that there will be a bot admin, receiving new delivery orders, sending couriers and marking orders as delivered.
Here is the complete list of features for this simple chatbot:

This chatbot is very simple, so it will have just a few simple skills. The complete development process should take around an hour only.
First, we’ll have the “start” skill to greet the user and offer him/her some options.
Next, we’ll have a “menu” skill, displaying the gallery of products that fit user’s search criteria.
To process delivery orders, we’ll need the “order” skill.
Another skill will be used to check the status of user’s order and add comments to orders that are not yet delivered. Let’s call it “status”.
These skills will be inter-connected with events, and “default” skill will trigger other skills based on the keywords detected in user’s message.

Our chatbot will be extremely flexible in terms of product catalogue. We’ll store everything in a Google spreadsheet, one product per row, with columns for:
Chatbot admin will be able to add more products and product categories easily, and disable product availability with a simple change of “Yes” to “No” in a spreadsheet cell.
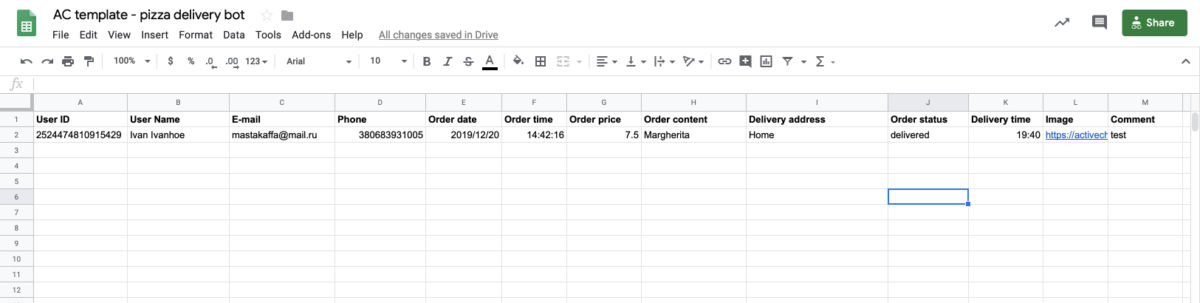
Delivery orders will be stored in another sheet of the same spreadsheet. For each order (one per line) we’ll put there:
Our “start” skill will be very simple. It will display “Choose something from our menu” message and then it will listen to user’s choice, displaying two quick replies – “pizza” and “salad”. Once user clicks one of these replies (or types anything else), “start” skill will continue to the SEND block, triggering “menu2” skill to display the menu.
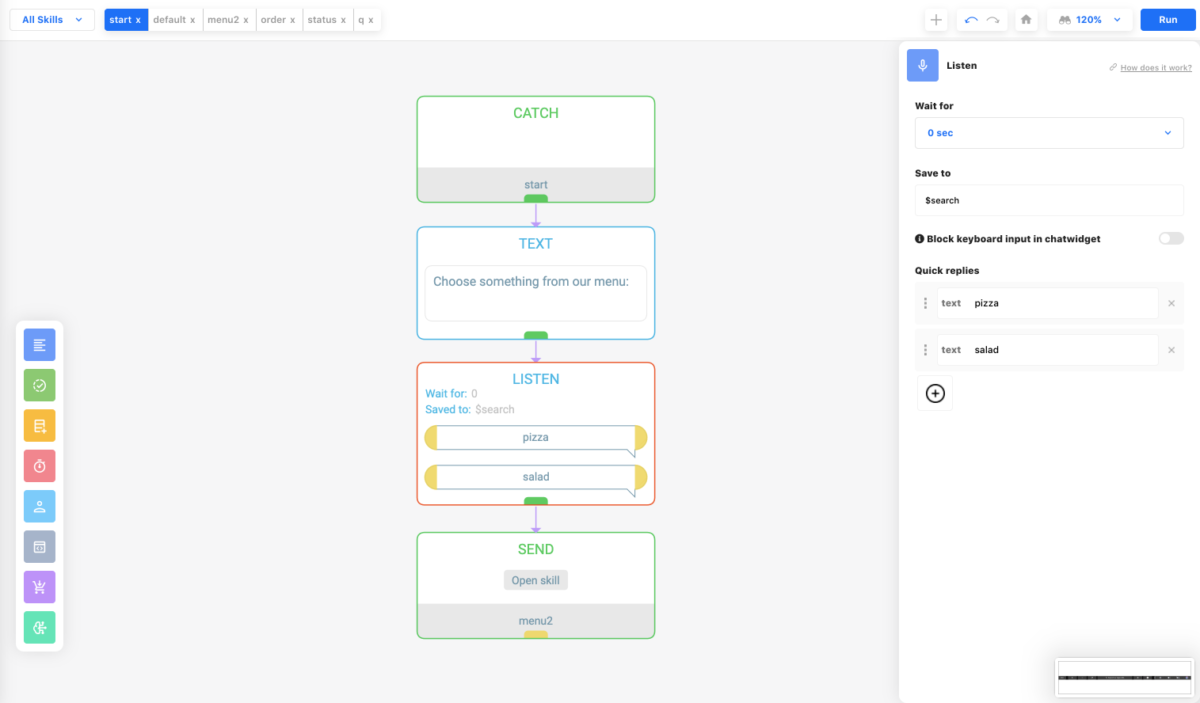
Instead of clicking “pizza” or “salad” quick replies, user can type something else – for example “dessert”. If there’s anything in “desert” category in your Google Sheet, then these products will be displayed. LISTEN block is saving user’s input to the $search bot attribute, which is used in the next skill.
Now comes the fun part. We have product category in the $search attribute, and we want to display a gallery of products from our Google Sheet that relate to that category. Something that would require advanced coding in any other chatbot platform can be done in Activechat with just a couple of blocks.
ℹ️ When working with dynamic galleries you should keep in mind Facebook’s limitations on gallery size – it’s limited to 10 scrollable cards. To make chatbot conversation flexible and able to display unlimited number of products we’ll use a simple navigation trick.
GS-GALLERY block will do a search on your Google Sheet and display a gallery of cards that fit the search criteria. Let’s look into this in more detail.

Once you connect your Activechat to your Google Account (go to Settings – Integrations – Google to do this), you can use GS-GALLERY block to build dynamic galleries from any spreadsheet. The block in the example above contains three self-explanatory parts:
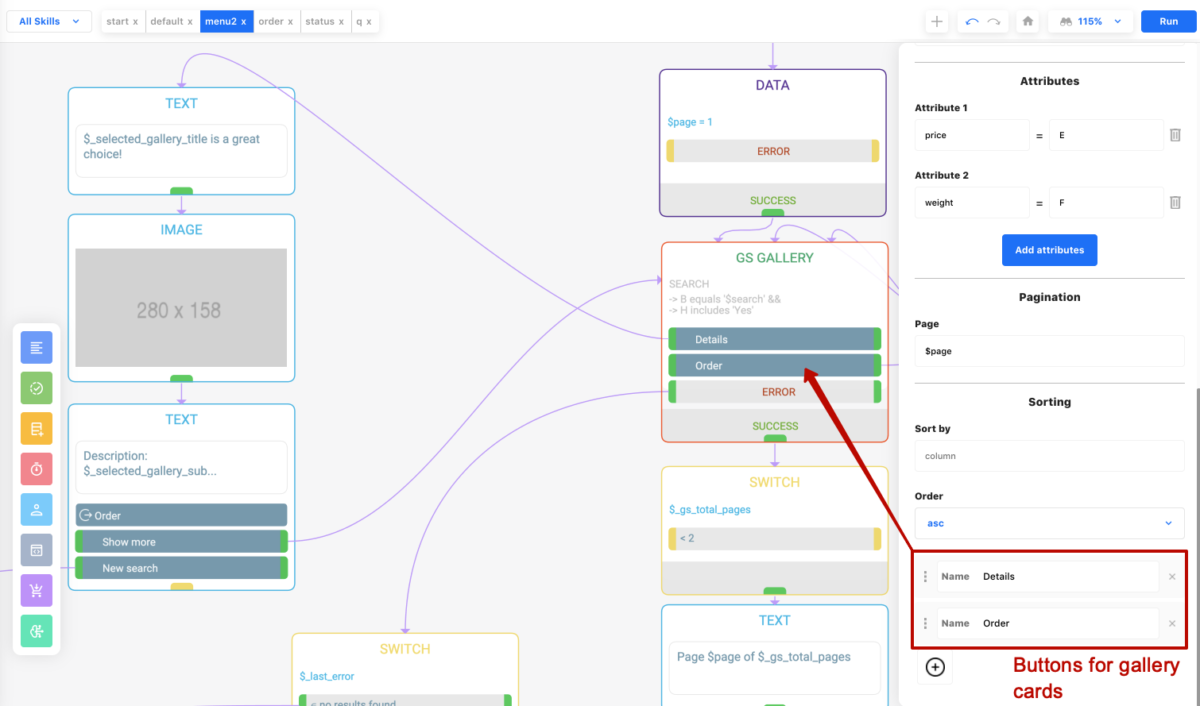
These buttons will be added to each card in the gallery. Once the user clicks any of these buttons, chatbot will continue to the connected block, while setting a number of attributes to values defined by the card content:
This gives your chatbot the ability to know which card was clicked, and you can use that data in the conversation that follows.
For example, when user clicks “Details” button, we want to display detailed info about the selected product. Note the use of dynamic gallery attributes in TEXT and IMAGE blocks that are connected to this button:
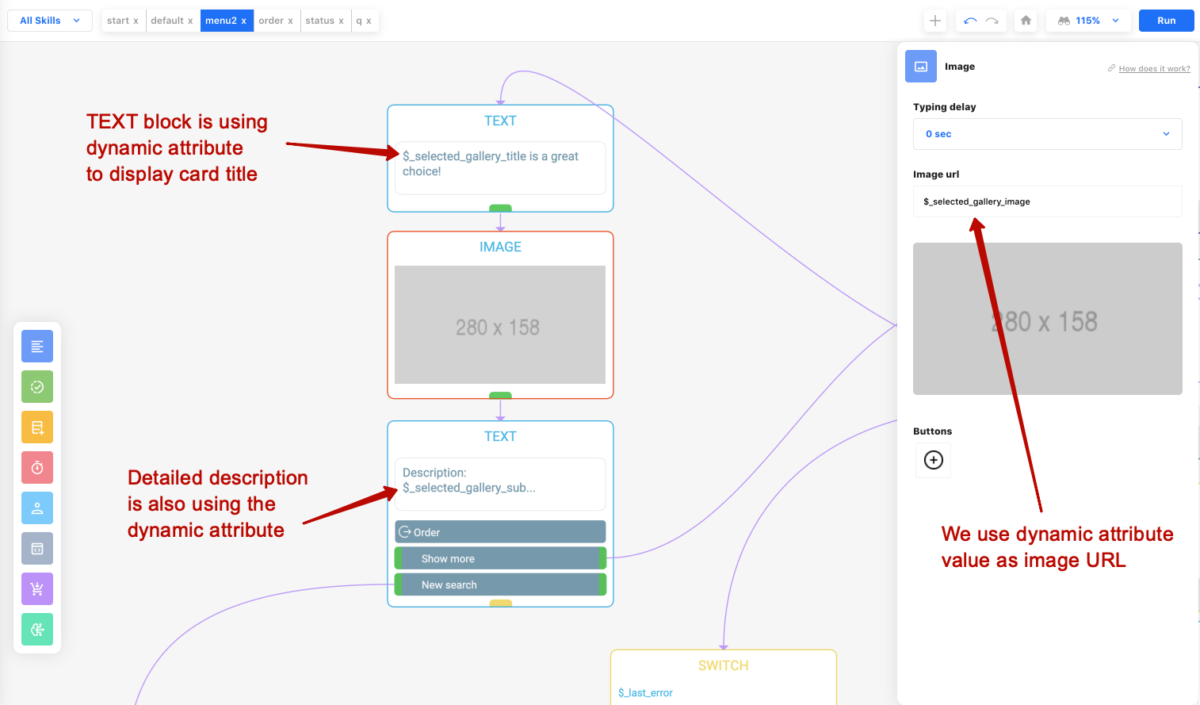
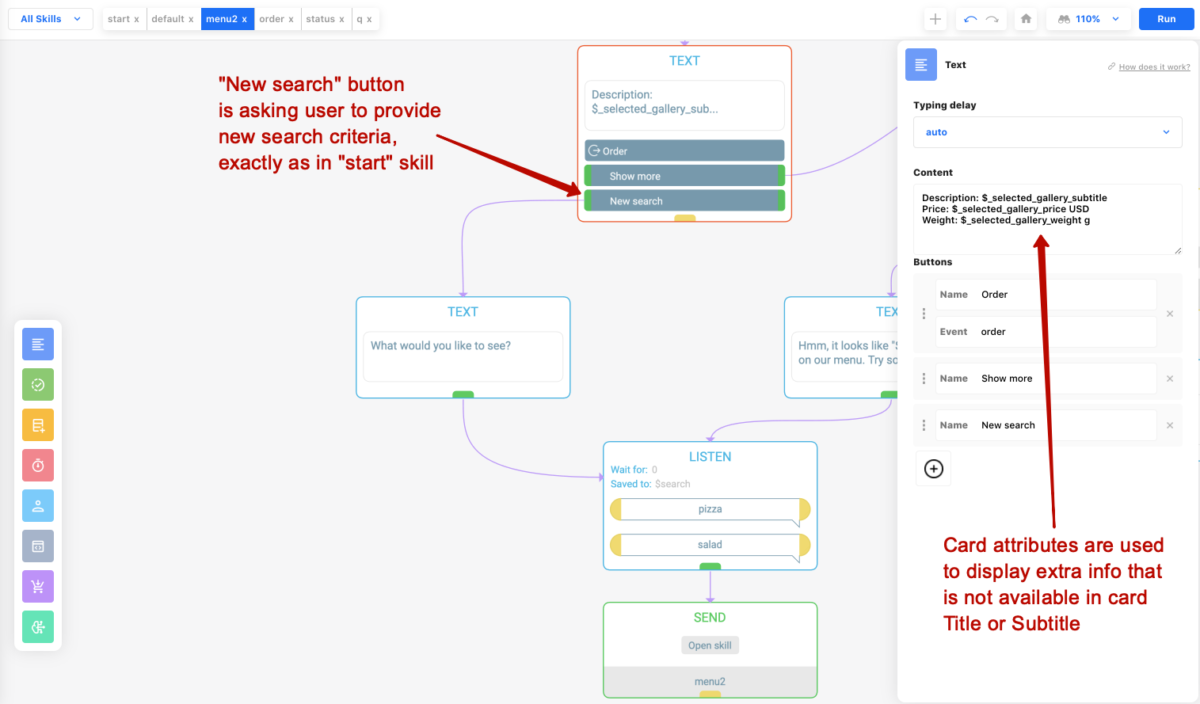
TEXT block that displays detailed product description from $_selected_gallery_subtitle contains two buttons. “Show more” will go back to the GS-GALLERY block, displaying the same gallery again, and “New search” will ask user for new search criteria.
Note the use of card attributes to display extra data (not available as card Title or Subtitle) in the detailed description. This allows you to store extra parameters with each gallery card, and these card-specific parameters can be used in the conversation when user clicks the card in the gallery:
Let’s see what happens if there’s more than 10 rows in your spreadsheet that fit GS-SEARCH block search criteria. Once this block is executed (and gallery built) you will have two system attributes to check the number of search results:

What’s going on here?
Immediately after we display the dynamic gallery with products, we check the value of $_gs_total_pages with SWITCH block. If it’s less than 2 (i.e. we have only one page of search results) we do nothing (notice that there’s no block connected to that exit in SWITCH). But if it’s 2 or more, we proceed to another SWITCH with three different options:

What happens when chatbot users click the “Order” button in our dynamic gallery or in detailed product view? Let’s see how the bot is sending these orders to the Google spreadsheet.
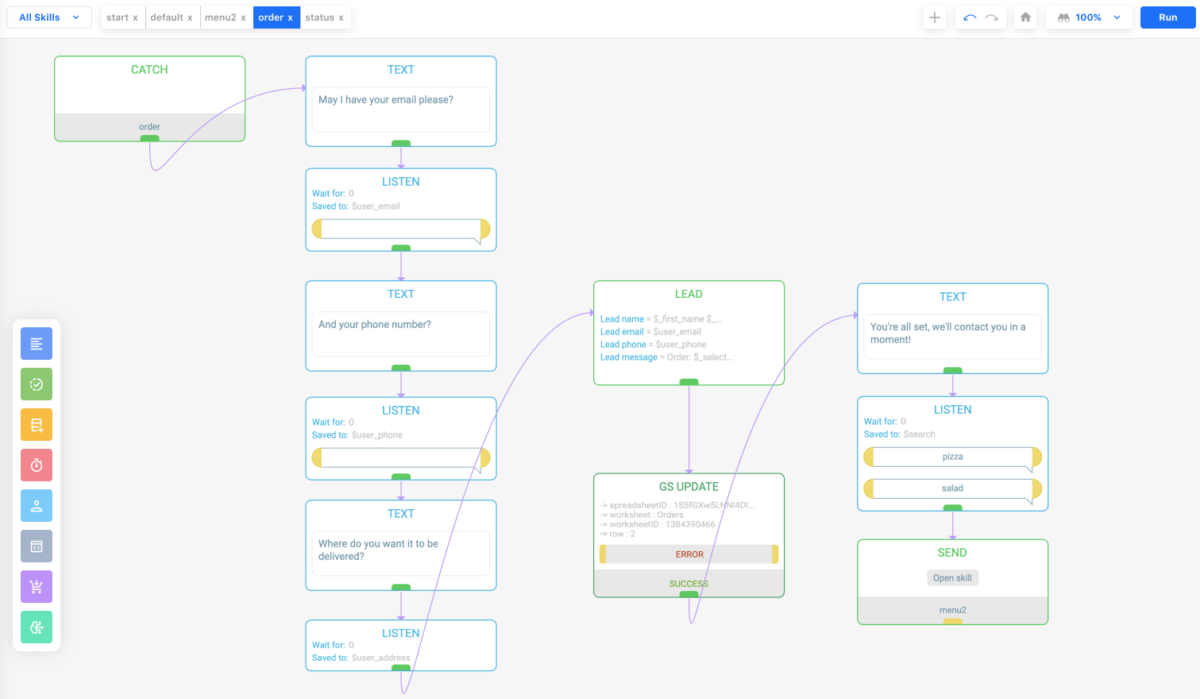
This flow is very simple. The bot is asking user a couple of questions like email, phone number and delivery address, and then sends this data to bot admin with the LEAD block and stores it to Google Sheets with GS-UPDATE block. When this is done, the bot displays “You’re all set” confirmation message and two quick replies to check pizzas or salads again.
LEAD block is combining user’s details and order data into a neat email message that is sent automatically to admin’s address.

After this, we proceed to GS-UPDATE block to store the order into Google Sheets.
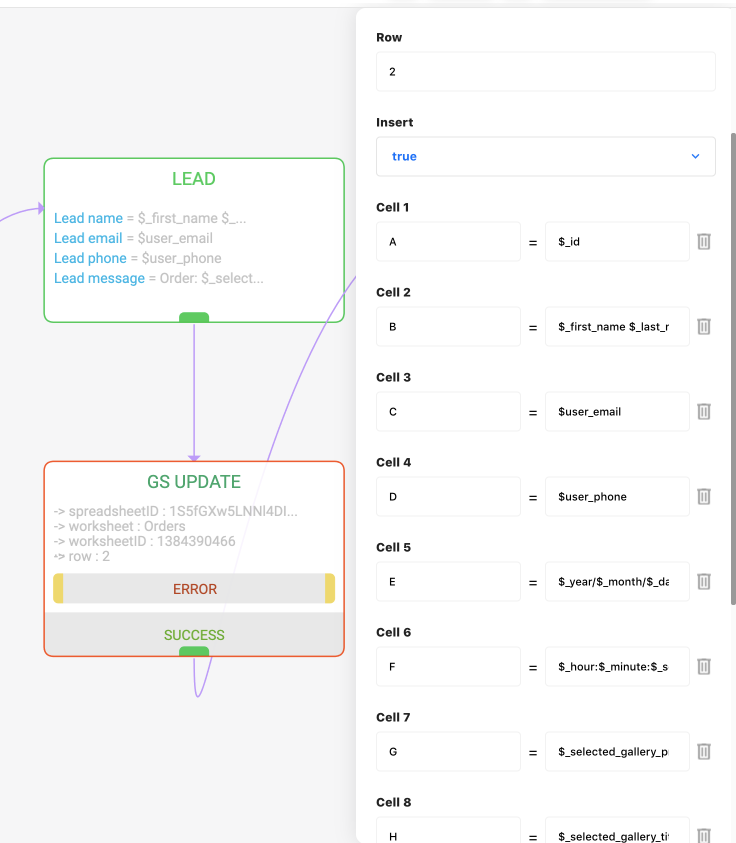
Notice – I’m setting “Insert” parameter to “true” and use “2” as the row number. It will instruct Activechat to add new rows above row 2, so that the latest orders are always on top of our spreadsheet (row 1 is reserved for column headers).
Cell values are obtained from attributes that the chatbot already has:
Let’s make it possible for our chatbot users to check the current status of their order (remember we have “Status” column in our Google Sheet which is supposed to be updated by bot administrator?).
The logic will be quite simple: once the user requests the status check, we’ll find a row in the Google Sheet with his (her) Messenger ID in column A and anything except “done” in column J (“Order status”) and display the status. It is supposed that at every moment there can be only one (or none at all) order in any other status – this can cause problems if user is placing multiple orders before admin changes their status to “done”. You can fix it with a simple check before accepting new order – just use a similar GS-SEARCH to check for open orders placed by the same user. Adding this check will be your homework assignment! 😁
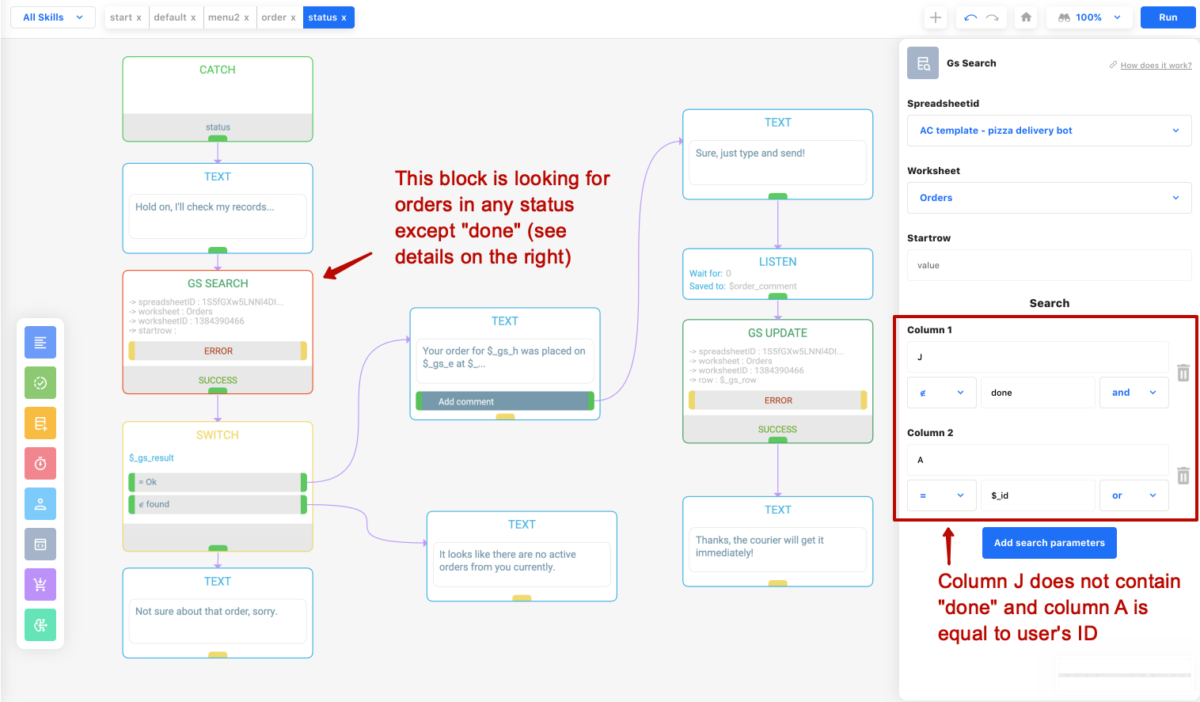
When this skill is triggered, the bot sends “Hold on, checking my records” message first and then we use GS-SEARCH to find a spreadsheet row where column A (user ID) is equal to the current user’s Messenger ID (it’s available in the $_id system attribute).
After GS-SEARCH is executed, we’ll check the value of $_gs_result system attribute. If it contains “This value was not found” (actually, I’m checking only for “not found”), it means that there are no active orders for that customer, and the bot is sending “It looks like there are no active orders from you currently”.
But if the value of $_gs_result is “Ok” – it means that the row was found, and we can update user with information from that row. So, the bot proceeds to the TEXT block:
This block is displaying data from Google Sheets row that the bot have found on the previous step. Notice the use of $_gs_<column> attributes – they are populated automatically after every successful search and contain values from every column in that row. That means that column A value will be available as $_gs_a, column B – as $_gs_b etc.
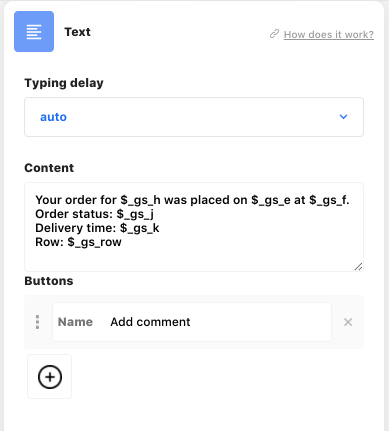
You may have noticed “Add comment” button in the TEXT block that displays order status. I’ve added it to allow chatbot users to leave comments for their orders (for example, how to get to the building, adding extras to the order or anything else).
When user clicks that button the bot says ” Sure, just type and send” and LISTENs to user’s input, saving it to the $order_comment attribute. Once the user send his/her comment, the bot proceeds to GS-UPDATE block, adding that comment to column M in our spreadsheet (and overwriting previous value in that column, if any).
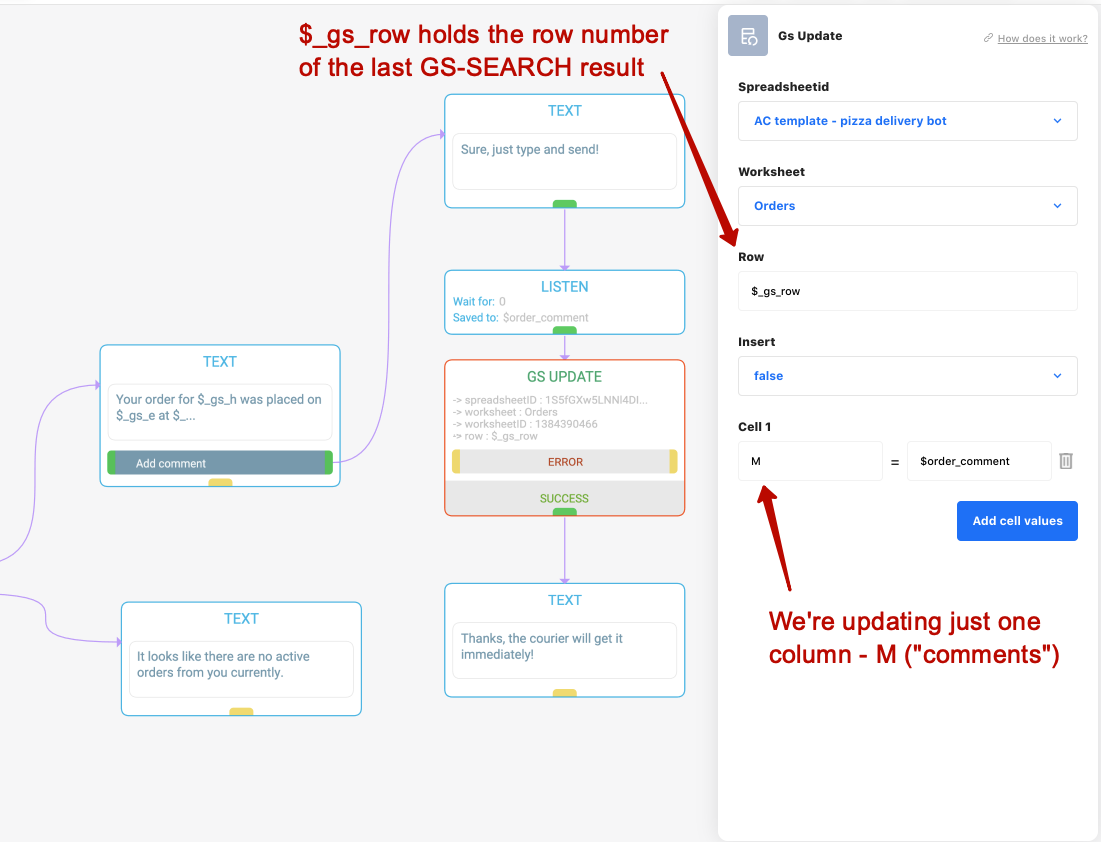
We’re using the value of $_gs_row attribute to specify which row in the spreadsheet should be updated. This attribute always contains row number of the last successful execution of GS-SEARCH block.
Notice that “Insert” option in the GS-UPDATE block editor is set to “false”. This instructs Activechat to update the existing spreadsheet row instead of adding new one. on top When we were accepting orders above, we set this parameter to “true” so that new orders would be piled on top of your spreadsheet.
How does the user triggers these skills and how does the bot know which skill to use?
To make it possible we’ve introduced a very simple keyword detection in the “default” skill. For a quick recap – this skill will be triggered every time when user is sending message to your chatbot and you do not have any LISTEN block actively listening to user’s response (i.e. the bot is in “idle” mode).
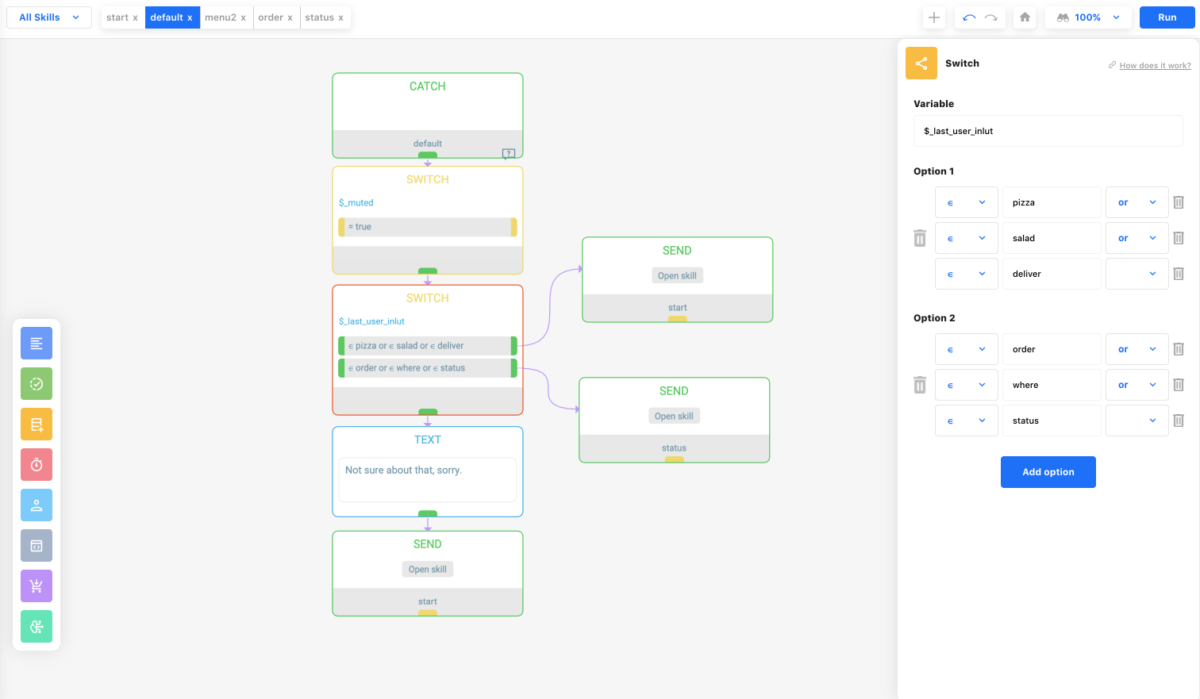
We’re using SWITCH block to check the value of $_last_user_input system attribute (it always contains the last message that user sent to the chatbot).
If this attribute contains “pizza” or “salad” or “deliver” (the user asked something like “how to order delivery?” or “I want pizza” etc), the bot will trigger “start” skill again (since the ordering starts in that skill, with “Choose something from our menu” message).
If $_last_user_input contains words like “order” or “where” or “status” (for example, user is asking “Where is my order?” or “What’s my order status?”), the bot will trigger “status” skill (see above).
Please keep in mind that SWITCH block is evaluating conditions top to bottom, in the order they appear in the block editor. So, if you’re checking for “deliver” keyword first (to answer questions like “How do you deliver?”) and then for “delivery” keyword (to answer “Where is my delivery?”) you should be aware that both phrases will trigger the first condition because “delivery” contains “deliver” as sub-string.
It looks like we’ve managed to build quite complex chatbot which is almost ready to be used in real-life application. Bot admin will be able to add new products and categories easily, adding new rows to Google spreadsheet. Admin will receive orders, update statuses and estimated delivery times and mark orders as “done” on delivery, and chatbot users will be able to browse products, make orders, check order statuses and leave comments.
It took us less than an hour to build that chatbot, and it’s just 5 skills with 58 blocks in total. Imagine doing something similar with Manychat or Chatfuel!
You can test the sample bot here 👉 Activechat Pizza Bot v.2
You can experiment, customize and improve that bot from the template – look for “Activechat Pizza Bot v.2” in our chatbot templates!

There are many improvements to make, of course. Throwing in a couple of extra blocks will add the ability to send instant in-Messenger notifications to bot admins or arrange direct communication between customers and delivery couriers right in the chatbot – we’ll be covering these and many other cool features of Activechat in the next walk-through sessions like this!
Did you like it? Just let me know in the comments on our Facebook community!
© 2018-2020 Activechat, Inc.