
Reading time: 15 min

Ready? Let’s go!
The flow of the basic chatbot for lead generation that we’ve already built is designed to start the lead generation campaign immediately when users start their conversations with a chatbot. Quite often, though, this is not an opportunity – your chatbot will live on your website or Facebook page, and conversations should start with another welcome sequence, which will introduce the bot and inform the user what it can do.
So, first of all let’s build a dedicated lead generation skill in your chatbot (and maybe duplicate it for different lead gen campaigns). If you’re not familiar with chatbot skills yet, don’t worry – we have a complete description of chatbot skills in our manuals.
Sign in to your chatbot dashboard, go to “Bot builder – Skills” in the menu on the left and choose the “start” skill tab. Zoom the skill out (if necessary) so that every block is visible. Then, hold the “Shift” on your keyboard and drag around all blocks to select every block except the first CATCH block that starts the skill.
Now, right-click any selected block and choose “Copy to clipboard” from the right-click menu.
Click the blue plus sign button in the skill tabs area to add new skill to your chatbot. We’ll use this skill for our lead generation sequence, and we’ll be running ad traffic directly to that skill, skipping the welcome message. Give your new skill a name (in this example, I’m using “lead_gen_1”).
Right-click the canvas again, and choose “Paste from clipboard” to paste your lead generation sequence here. Don’t forget to connect the CATCH block that starts that skill with your pasted sequence, and click “RUN” to compile your bot.
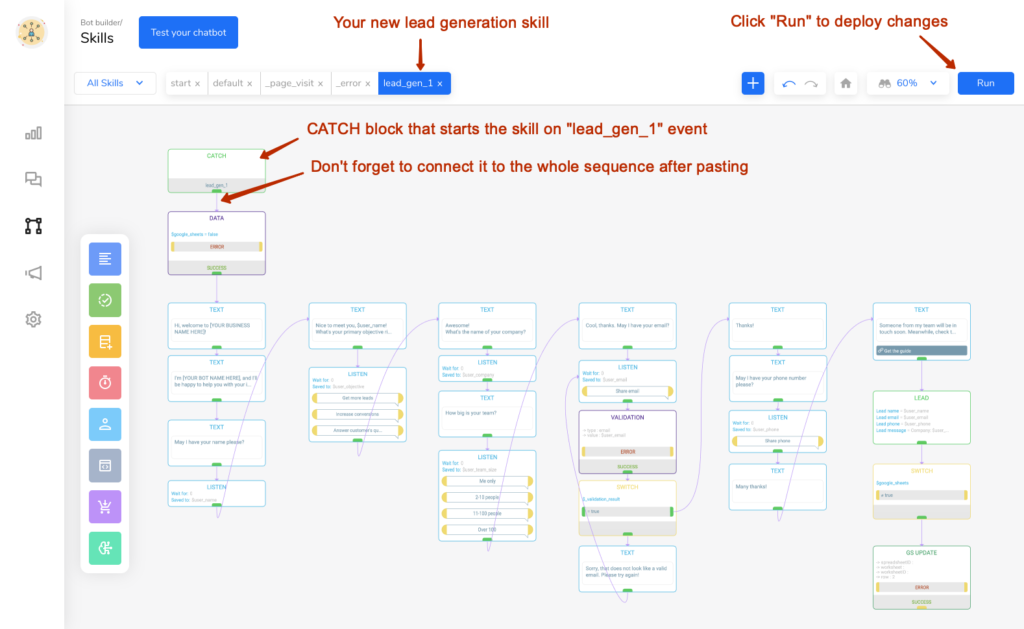
To test your new skill, click the “Test your chatbot” button and type “/lead_gen_1” in the conversation. This will trigger the skill, and your lead generation sequence should start. If it does not, most probably you’ve either forgot to click “Run” or didn’t connect the CATCH block with the rest of the sequence. Fix it.
By the way, if you type “/” sign followed by the event name in your chatbot conversation, it will trigger that event and start the skill. You can learn more in the “Triggering chatbot skills” article in our manuals.
Now we need to remove the lead generation blocks from the “start” skill and make this skill more generic, suitable for your Facebook page or website chat widget.
Like many other things in Activechat, this can be done in multiple different ways.
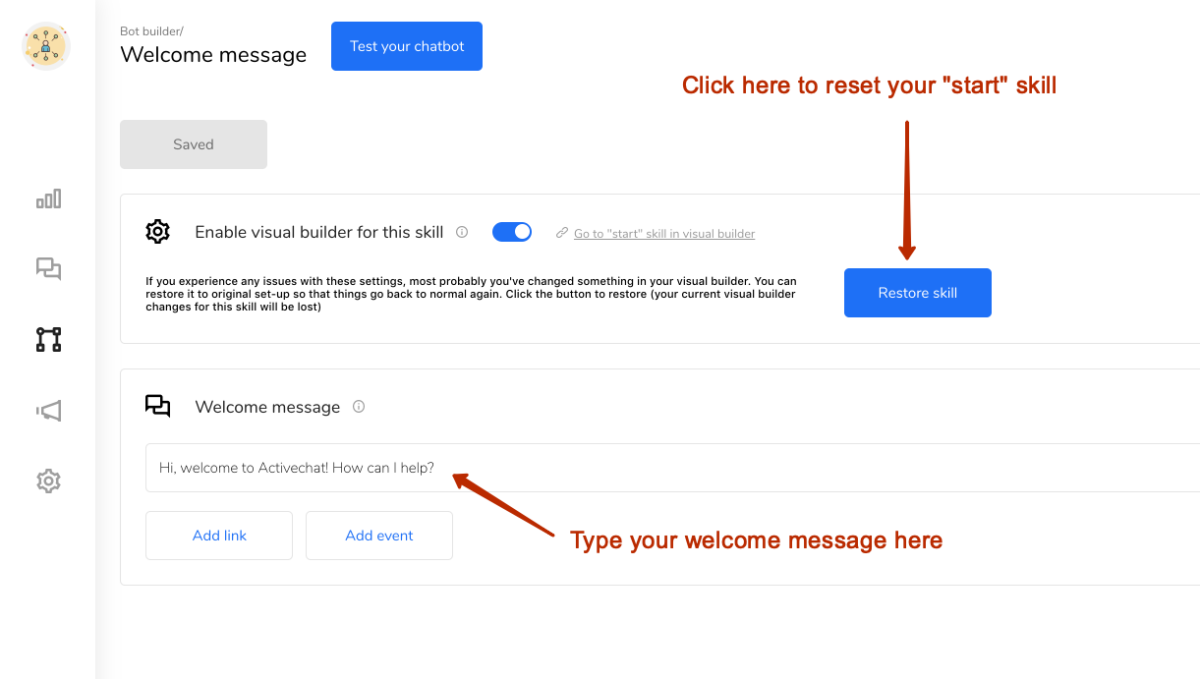
The easiest option is to choose “Bot builder – Welcome message” in the main menu on the left, and click “Restore skill” button. It will replace the content of your “start” skill with a predefined template that was built to support our “quick and dirty” welcome message from the bot settings. Once you click it, enter your new welcome message and click “Save” and then “Update skill”
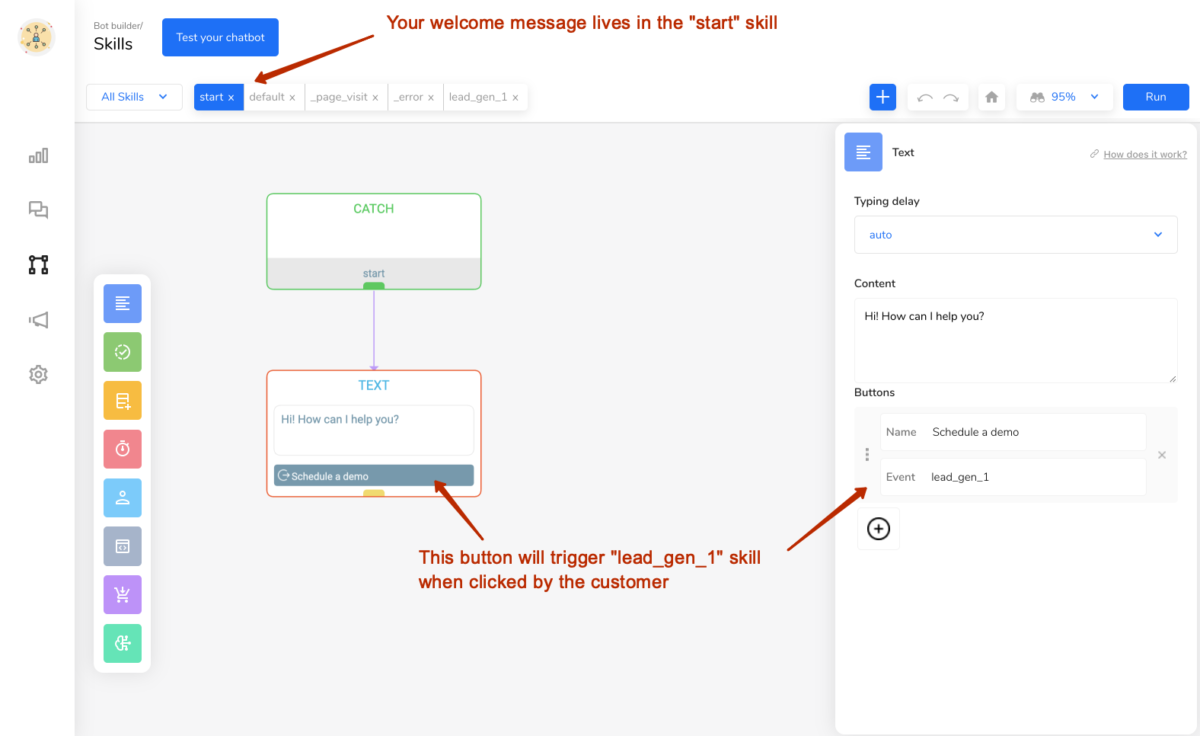
You can also use visual flow builder to design more complex welcome sequence – for example, to include a button that will take your customers straight to the lead generation flow. To do so, toggle the “Enable visual builder for this skill” switch in “Bot builder – Welcome message” and open the “start” skill from “Bot builder – Skills”.
Delete default blocks from the “start” skill (remember to keep the leading CATCH block intact!) and use TEXT (or any other blocks) to build your welcome sequence. You can add an “event” type button which will take your customers to the lead generation skill – just use the same event name (“lead_gen_1” in our example) for that button.
What if you have multiple lead generation campaigns? Can this be done in Activechat? Absolutely!
You can have any number of lead generation skills in your chatbot, each customized for specific use case or ad campaign. We’ll look into setting up chatbot ad campaigns on Facebook in a moment, so let’s start with duplicating our lead gen skill and changing its content.
Imagine that you’re planning another lead gen campaign that will not require customers to enter their company name or phone number. Just two simple questions – customer’s name and email, and that’s all. We’ll duplicate our lead gen skill and remove unnecessary parts.
Open your lead generation skill in the visual builder (“Bot builder – Skills”), right-click the skill tab with your mouse (in our example it’s “lead_gen_1” skill) and choose “Duplicate skill” from the right-click menu. A new skill will appear with a temporary name, and you can right-click it’s tab to edit the name (choose “Edit skill” from the right-click menu).
IMPORTANT! Do not forget to change the name of the event that will be triggering this skill! If you forget to do this, the same event (“lead_gen_1” in our example) will be triggering both skills simultaneously. This will definitely cause a lot of confusion – messages doubled, different messages displayed at once, etc. So, click the CATCH block at the beginning of your new (duplicated) skill and change event name to “lead_gen_2”, for example (you can choose any other event name if you want).
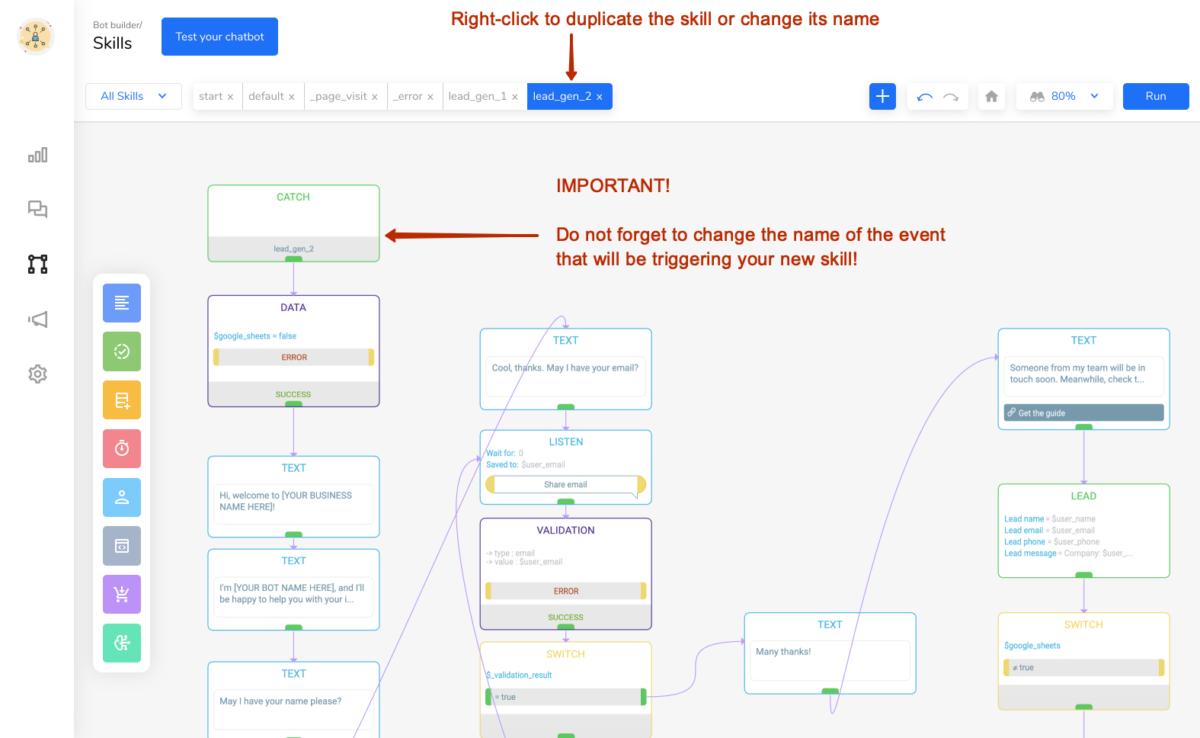
Now, customize your new flow by removing unnecessary blocks and adding extra messages / questions / etc that you need (see the video above for details). Once you’re done with it, click the “Run” button to deploy your changes to the cloud.
Now, you will have two independent lead generation skills in your chatbot, each of them triggered by it’s own event. You’re ready to start driving traffic to these skills with ad campaigns!
As you may have already noticed, every Activechat bot is built around various skills that it can handle, and in this example we’ve already created two different lead generation skills – “lead_gen_1” and “lead_gen_2”. The best part about Activechat architecture is that any of these skills can be triggered independently for new chatbot users, skipping the welcome message. One of the most frequent use cases for this is running ad campaigns that drive traffic to specific bot skills (lead generation in our example). Once that skill is completed, users can access any other skill in the chatbot according to the conversation flow that you’ve designed.
As an example, let’s see how you can set up Facebook Ad campaigns to drive traffic to each of your lead generation skills.
Campaigns that send traffic to Facebook bots are called “Click-to-Messenger” campaigns in Facebook Ads Manager. Their primary goal is to start new conversations with your Facebook Page. When you have your chatbot connected to your Page, these messages can be handled automatically by the bot.
So, start with opening your Facebook Ads Manager and create new campaign, choosing “Messages” as your marketing objective.

Name your campaign and click “Continue”. Next, at the “Ad set” step, choose “Click to Messenger” as destination, set your ad audience, placements and budget settings exactly as you do with other ad types, and continue to the ad setup.
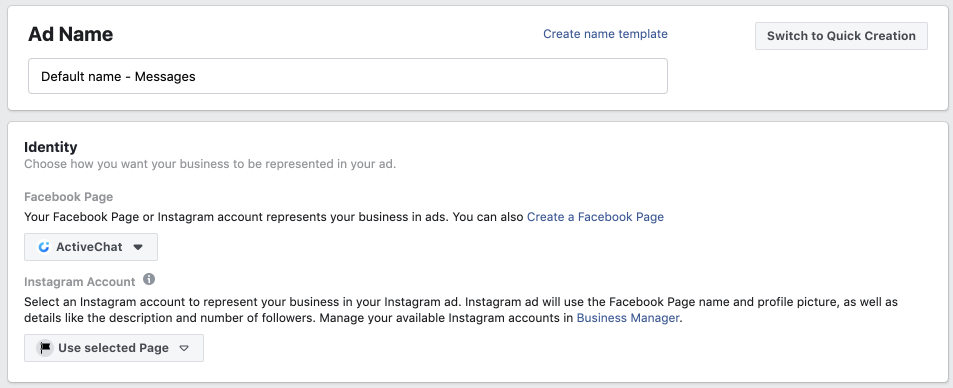
For those of you who have multiple Pages in their ad accounts, it’s essential to choose the right page in the “Identity” section (it should be the same page that your bot is connected to).
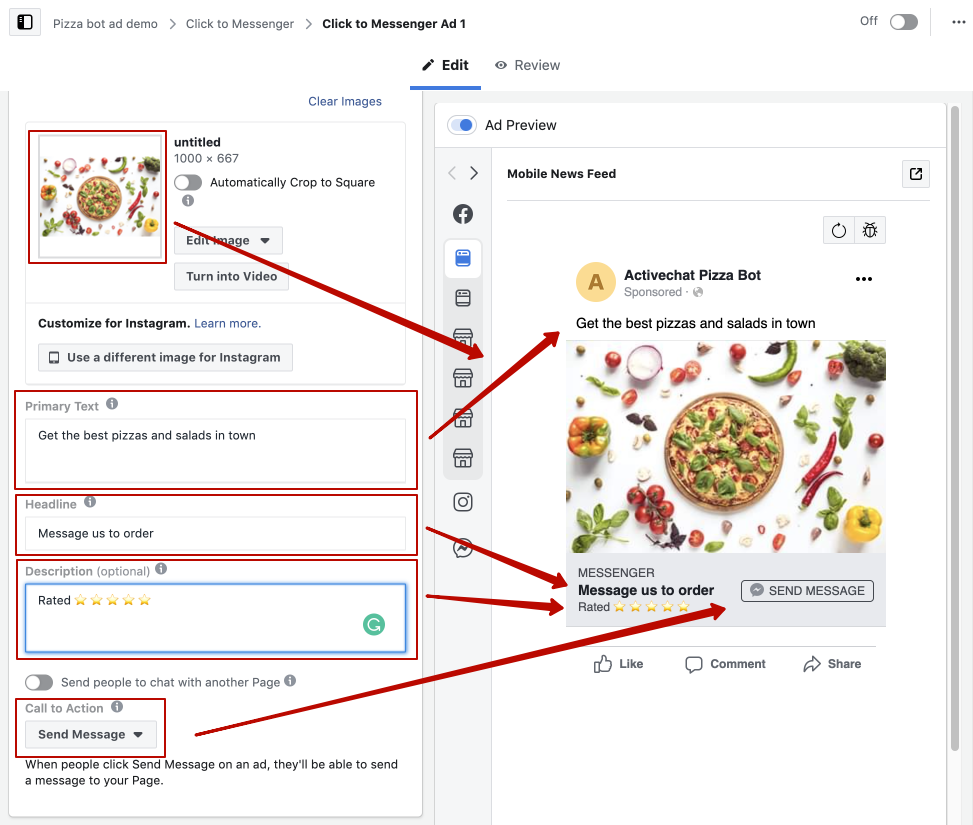
Building your ad creative is similar to any other ad type on Facebook – choose the image or video (or gallery), headline, text, description and CTA. We advise to use “Send message” as CTA to make it clear for your customers what will happen when they click your ad.
Example below shows a creative for a pizza delivery chatbot, but it can be customized for your business case (particularly, lead generation).
Once the creative is in place, you should continue to Messenger setup. Scroll to that part of the ad setup screen and choose “Create new”. Later, when you have some Messenger templates designed, you will be able to choose one of them by switching to “Use existing” instead.

Choose the “Start conversations” template and click “Edit” to customize. Once you click “Edit”, another window will pop up, pre-populated with some standard questions from Facebook (we’ll get rid of it in a moment).
Messenger template consists of two parts – greeting and customer’s actions. When customers click the CTA button in your ad, Facebook will send them the greeting and expect them to take some action.
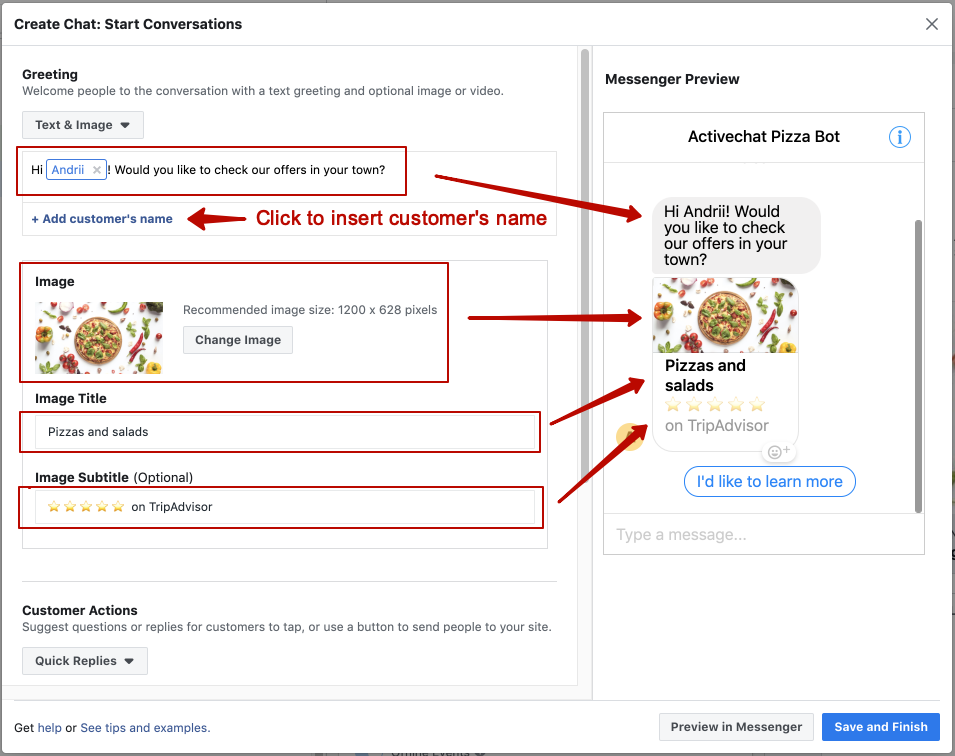
First, choose what kind of greeting you would like to use in your click-to-Messenger ad. Your options are “Text only”, “Text and image” and “Text and video”. In the example above we’ve been using “Text and image” to make the customer experience more consistent (using the same image in the template that we used in the ad creative), but the choice is completely yours. In certain situations “Text only” option will work best.
Next, type the greeting text in the box below. You can personalize it with the customer’s first, last or full name. Designing this part is crucial for your conversion rate and ROI since it will define the first impression that the customer gets from your chatbot.
Finally, you need to design certain “actions” that the customer is supposed to take upon seeing the initial “greeting”. Scroll down to the “Customer Actions” section and choose which options you would like to use. It can be either “Buttons” or “Quick replies”. Do not use “Frequently Asked Questions” or “None” – both of it will reduce your conversion rate dramatically since these options are for Pages that do not have a chatbot connected.
Based on our research, the “Quick replies” option works best in terms of interaction quality, but your case can be different. To learn more about differences between buttons and quick replies, check “How to use buttons and quick replies with Facebook Ads” article in our manuals. For now, let’s stick to quick replies.
Usually, you will want just a single quick reply that customers will click to start the conversation with your chatbot. Reducing the choices in your Messenger template will increase conversions. Keep the quick reply text simple and focused on your offer.
Since you already have different chatbot skills in Activechat, you can experiment with multiple quick replies, each triggering different (or even the same) skill in the chatbot. Refer to “How to use buttons and quick replies with Facebook Ads” article and don’t forget to share the results of your experiment with us!
In our simple example, we’re using two quick replies (“Sure!” and “Why not?”) that will trigger the same skill in the chatbot.
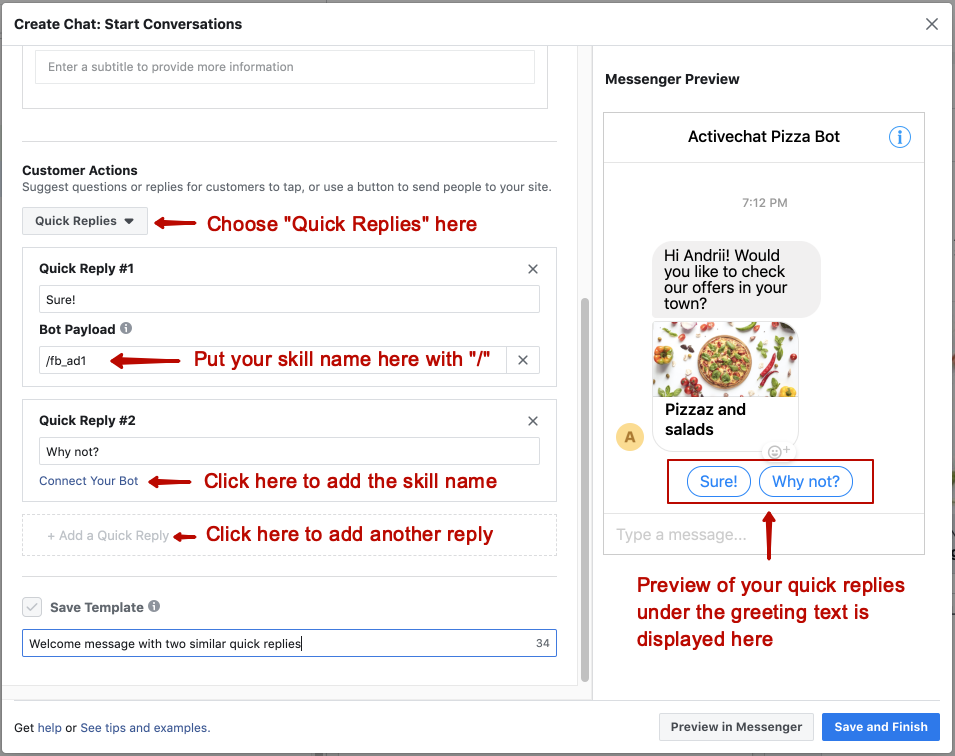
Edit quick reply text and click “Connect your bot” to specify the skill that should be triggered once the customer clicks on this reply. Add your skill name (actually, the name of the event that triggers that skill), preceded by the “/” sign. In the example above, we’re using the “fb_ad1” skill, but you should replace it with the name of the actual skill that should be triggered by this ad. Since we’ve named our lead generation skills “lead_gen_1” and “lead_gen_2”, choose one of these names here.
IMPORTANT! Please note that if you do not specify the event name, the “default” skill will be triggered when the customer clicks that reply. The reason for this is that quick replies are treated as regular messages sent by your customer, and the “default” skill is triggered on every incoming message. The text of the quick reply will be available in the $_last_user_input system attribute. When you specify the event name in the “Connect your bot” box, the “default” skill will not be triggered.
You’re almost there! Give your Messenger template a recognizable name (remember you can re-use it in other ads and campaigns?) and click “Save and Finish”. You can also click “Preview on Messenger” to see how the template will work – Facebook will send the message to your own Messenger account.
Now you can preview your ad on Facebook, and publish it once you’re satisfied with the result. Don’t forget to experiment a lot, since fine-tuning your Messenger template and the conversation flow in your Facebook ads chatbot skill will have a dramatic effect on your conversion rate and ROI.
Repeat the process above for any other lead generation ad campaign that you have in mind, choosing various chatbot skills as Bot Payloads for your buttons and quick replies.
Quick reminder: do not forget to click “Run” in Activechat bot builder when you copy or create new skills. Until you do this, the skills will not be deployed to your actual chatbot and Facebook ads will fail. Always test your ads by previewing it on Facebook to make sure that the right template is used, and the correct skill is triggered when the user performs an action.
And, last but not least, keep experimenting and be creative with your conversation flows. As said before, even the most subtle changes can affect your ad performance immensely!
© 2018-2020 Activechat, Inc.