
and set it live in 15 minutes

Welcome to the world of chatbots! 🤖
Getting started with a technically complex product is always a challenge, so we’ve prepared this short guide to help you get your first chatbot up and running in a very short time. Reading and watching this guide will take approximately 15 minutes, and your bot will start bringing you new leads in less than half an hour after that – even if you’ve never heard about chatbots before!
IMPORTANT: please add andrew@activechat.ai to your address book (white-list the address, or mark the email as “Not spam” if it ended in your spam folder) to make sure that you get our emails with manuals and other important info (like lead data and notifications) from Activechat.
The conversation in this chatbot is quite simple – it asks for the visitor’s name, then asks a couple of business-specific questions (which you will be able to customize) and finally gets visitor’s email and phone number, sends the data to your email and (optionally) adds it to Google Sheets and your CRM.
For those of you who already have some background with chatbots and software, we’ve included some extra steps (they are marked with “ADVANCED” tag) to show the powers of Activechat, but you can easily skip them until later.
Ready? Let’s go!
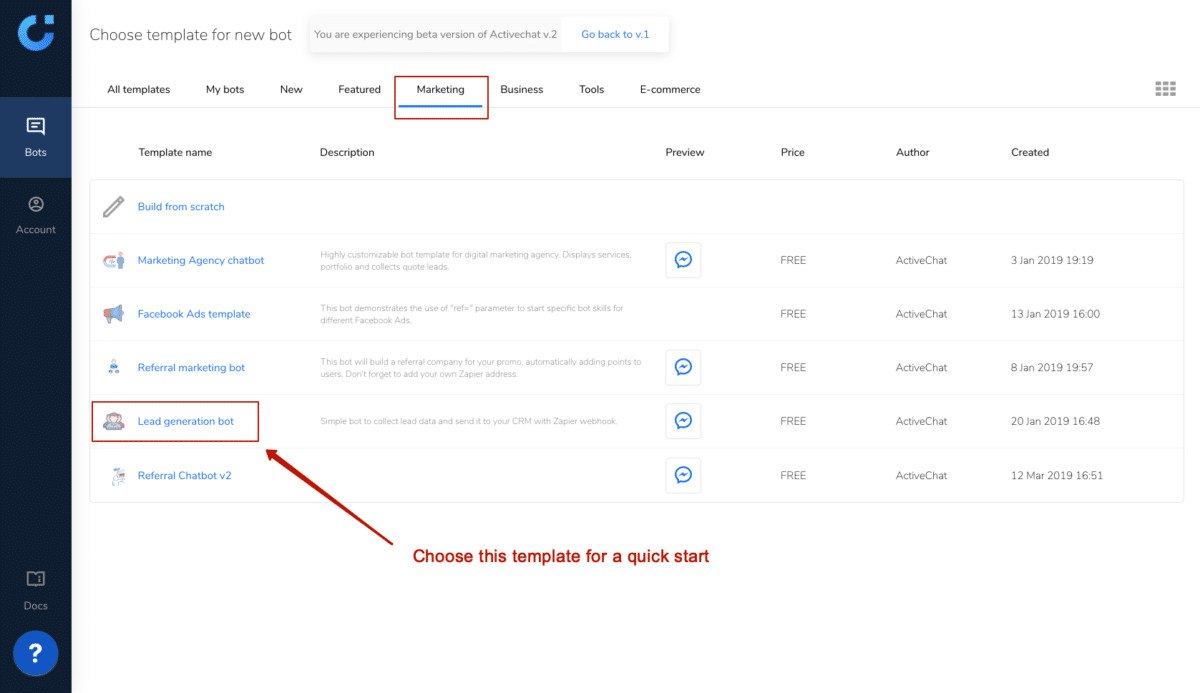
Start with logging into your chatbot dashboard and click “New bot”. In the templates, choose the “Marketing” tab and click the “Lead generation chatbot”.
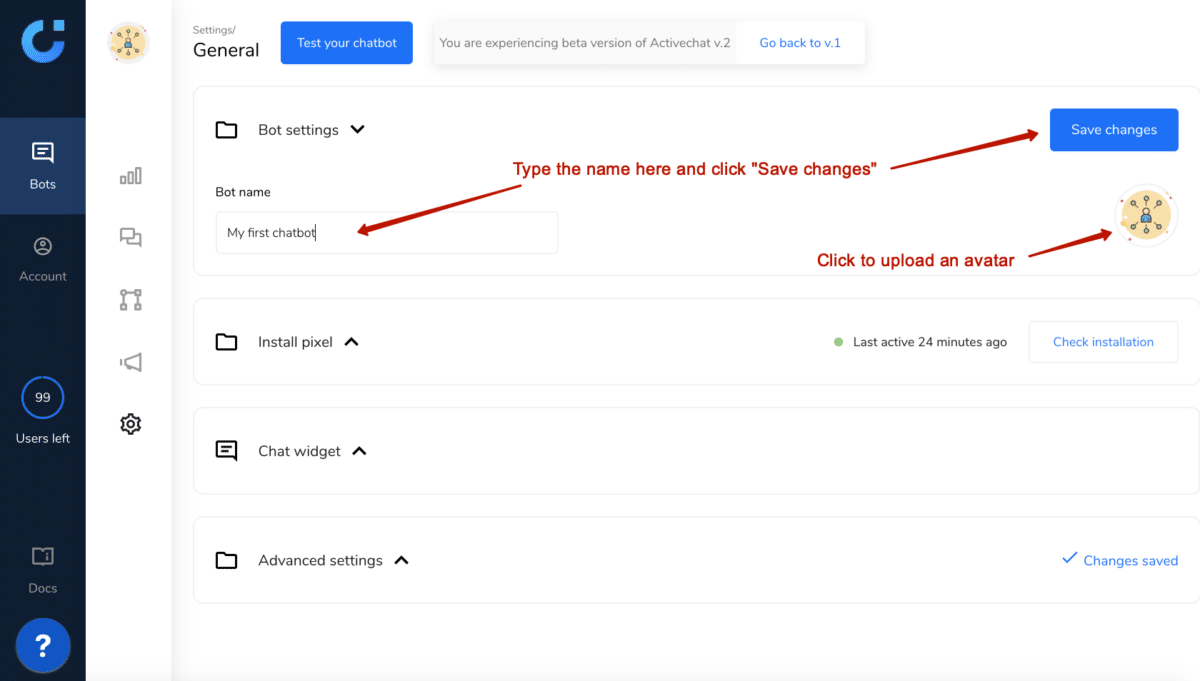
Once you do this, you will be taken to the bot settings page where you can choose a name for your new chatbot and upload an avatar (it will be displayed in the chat widget on your website pages).
Now you can click the “Test your chatbot” button at the top to open the stand-alone chat widget (later, at step 3, we’ll embed it into your website). Walk through the conversation as if you were the visitor of your own website, check your mailbox for that “You’ve got new lead” email when you answer bot’s questions, and let’s see how the conversation can be customized to your specific business case.
Now let’s customize the conversation so that it fits your actual business use case. You will love the power and flexibility of our visual chatbot builder, once you’re familiar with some basic concepts.
Click “Bot builder” in the menu on the left and choose “Skills”. Don’t worry if you have no idea what a “skill” is – you can check our “Building chatbot conversations” guide later.

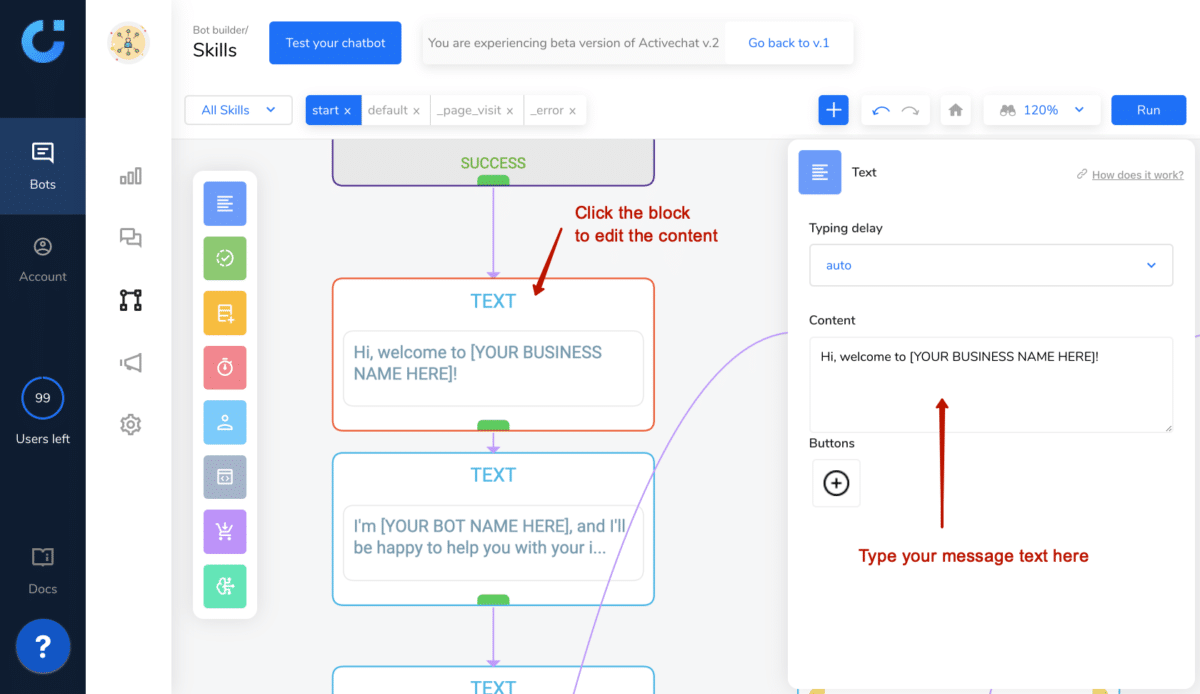
Find the “start” skill in the tabs on top of the page and you’ll see some basic building blocks that outline the conversation. Click the block on the canvas to edit its content.
Each message sent by the bot comes from a TEXT block, and you can start with adding your business name and chatbot name in the first two blocks.
After these first messages are displayed, the bot starts listening to the user’s input with the LISTEN block. Actual user responses are saved into chatbot attributes and you can use it later in the conversation. We’ll skip the first LISTEN that is asking for user’s name, and move straight to the second one, which is showing three canned responses (called “quick replies”). Your visitor can click one of these responses as an answer to the bot’s question (“What is your primary objective?”), and you can customize both the question itself and the options displayed by the chatbot.
Uncheck the “Block keyboard input in the chatwidget” to enable free-form input by the user.
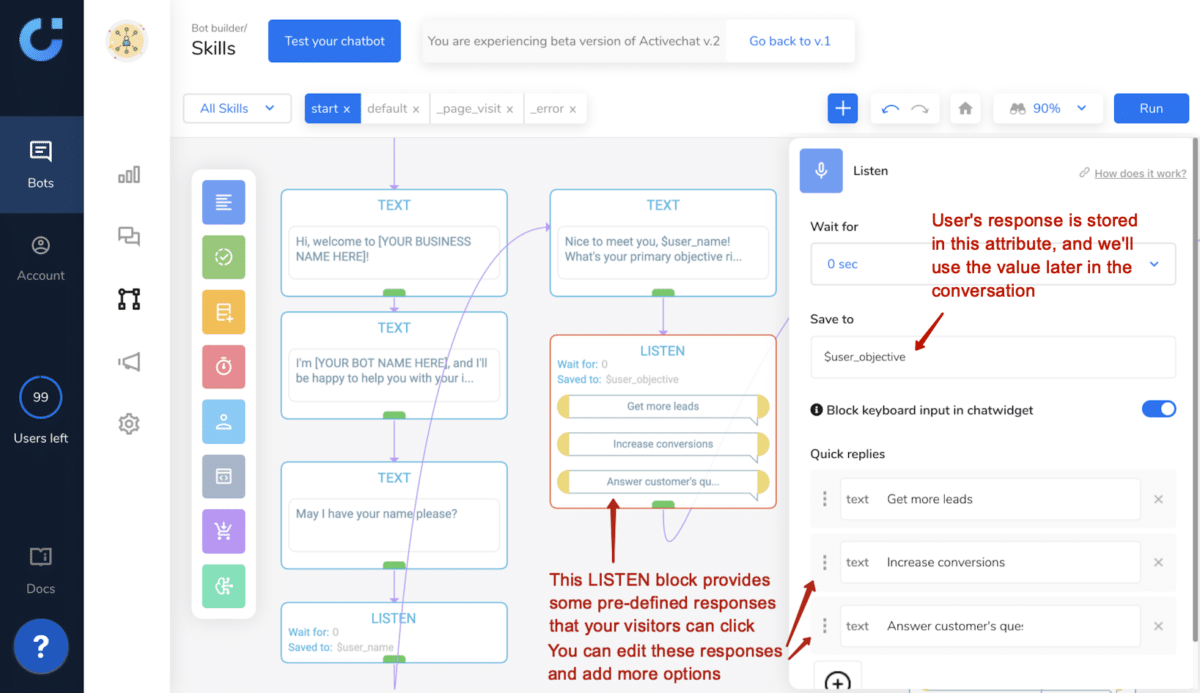
If you want to add more questions, just copy and paste some TEXT and LISTEN blocks, and reconnect them in the required sequence by arrows that you can pull from the connection point at the bottom of each block. Change message texts and don’t forget to change attribute names in LISTEN blocks to save user responses to specific attributes.
There are three questions in this chatbot template: visitor’s objective, visitor’s company name and visitor’s team size. Make sure that these questions are relevant to your use case, customize it as described above and add or remove some questions if you need to. Just keep in mind that chatbot is sending messages with the TEXT block, and gets responses from your visitors with LISTEN block. It means that every question should contain one or more TEXT blocks and a single LISTEN.
Once the chatbot gets responses to each of these questions, it displays a confirmation message with a button that takes your visitor to some specific page on your website. Again, you can customize everything – the text of that message, the name of the button and the link that it contains.

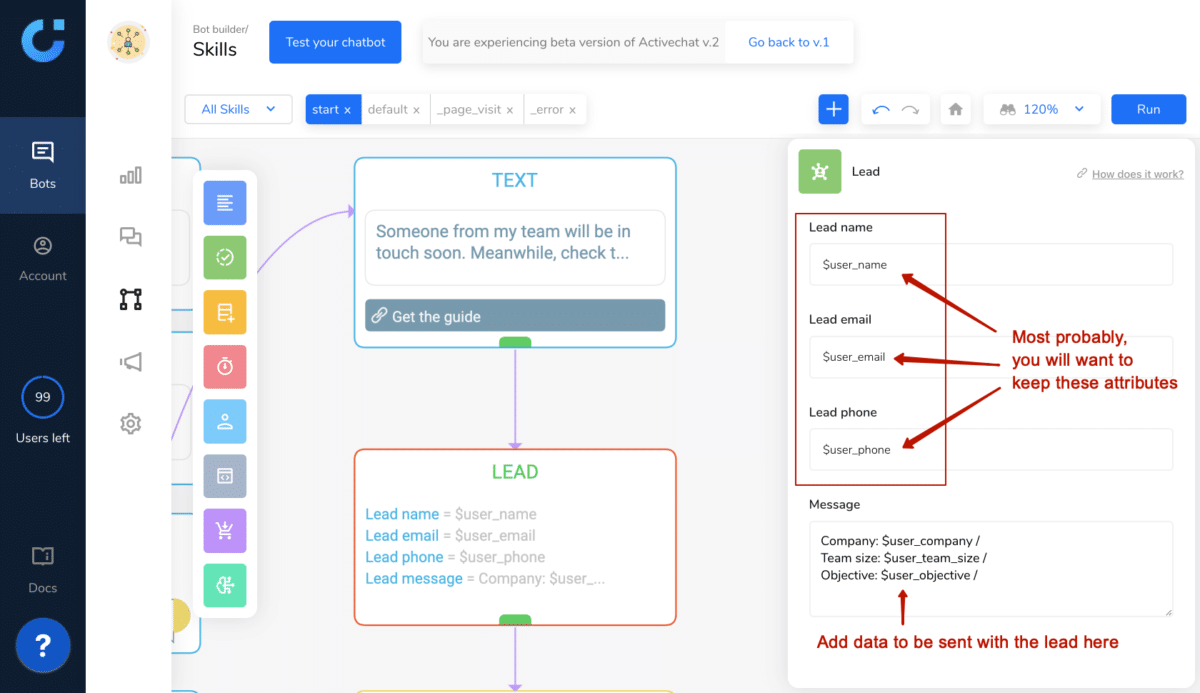
There’s a LEAD block after the last question that your chatbot asks. This block is sending lead data to your email address (Activechat will use the same address that you use to log in to the platform). Again, you can customize the content of the “Message” field in the editor to include any extra answers that you stored in user attributes when changing the conversation flow. This data will be delivered to your mailbox together with other attributes that chatbot collected from the user.
Once you’ve made some changes to the conversation, click the “Run” button in the top right corner of the platform to push the new conversation to your chatbot. It takes 4-5 seconds to build, and you can immediately click “Test your chatbot” to go to the chat widget again. Hint: right-click the “Test your chatbot” button and open the link in incognito mode to restart the conversation, or just type “/start” in the existing conversation to start it from scratch. (Advanced – there are multiple ways to trigger chatbot skills in Activechat, and typing “/” followed by the skill name is just one of them).
Cool, your bot is ready now, congrats! Did it take more than 10 minutes to customize? Your lead generation questions can be too complex then, and it makes sense to reconsider your conversation flow. Remember, keeping the conversations as simple as possible is the key to getting more leads and conversions!
Now, let’s connect this chatbot to your website and Facebook page and put it to work.
To connect the bot to your Facebook page, go to “Settings – Channels” in the main menu on the left, and click the gear icon in the “Facebook” tile. Authenticate with your Facebook account and click “Connect” to the right of the page that you want your bot to be connected to. It will start the conversation that you’ve just built for every new user who is messaging your Page. Check our “Messaging channels – Facebook Messenger” guide for more details.
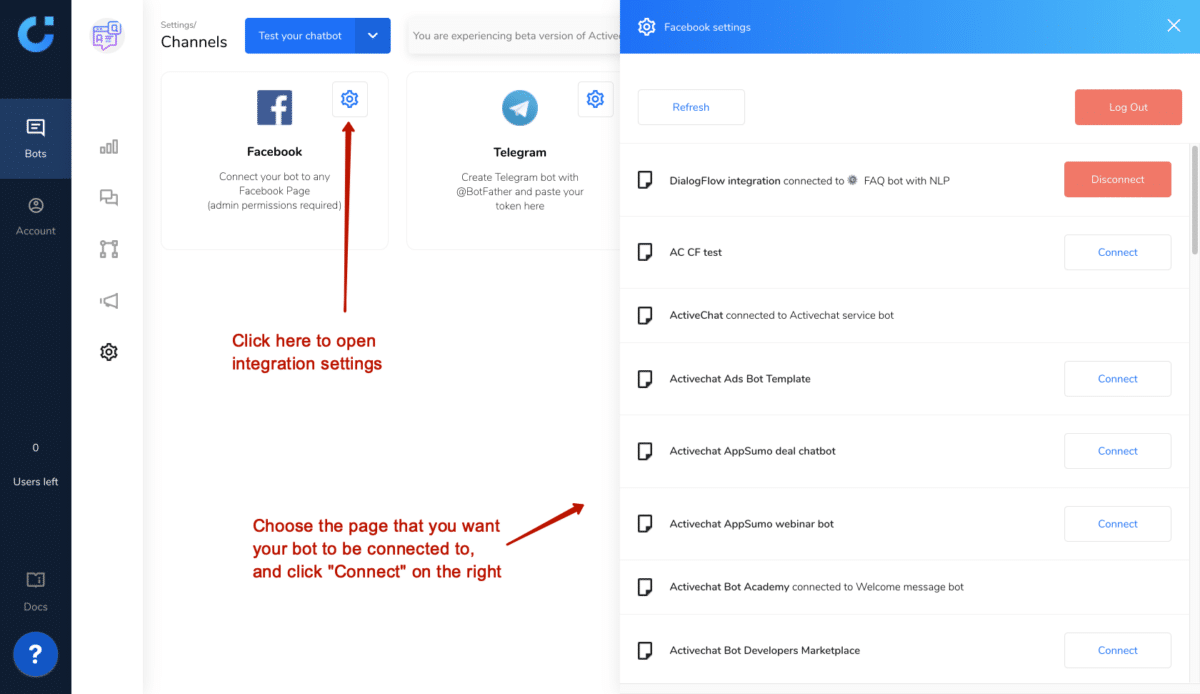
IMPORTANT: Make sure that you have Admin rights for the Page that you want to connect, and that you give Activechat permissions to access that page when authenticate with Facebook for the first time. Hit “Refresh” in the integration settings to grab new pages from Facebook if you’ve been added as Admin there recently.
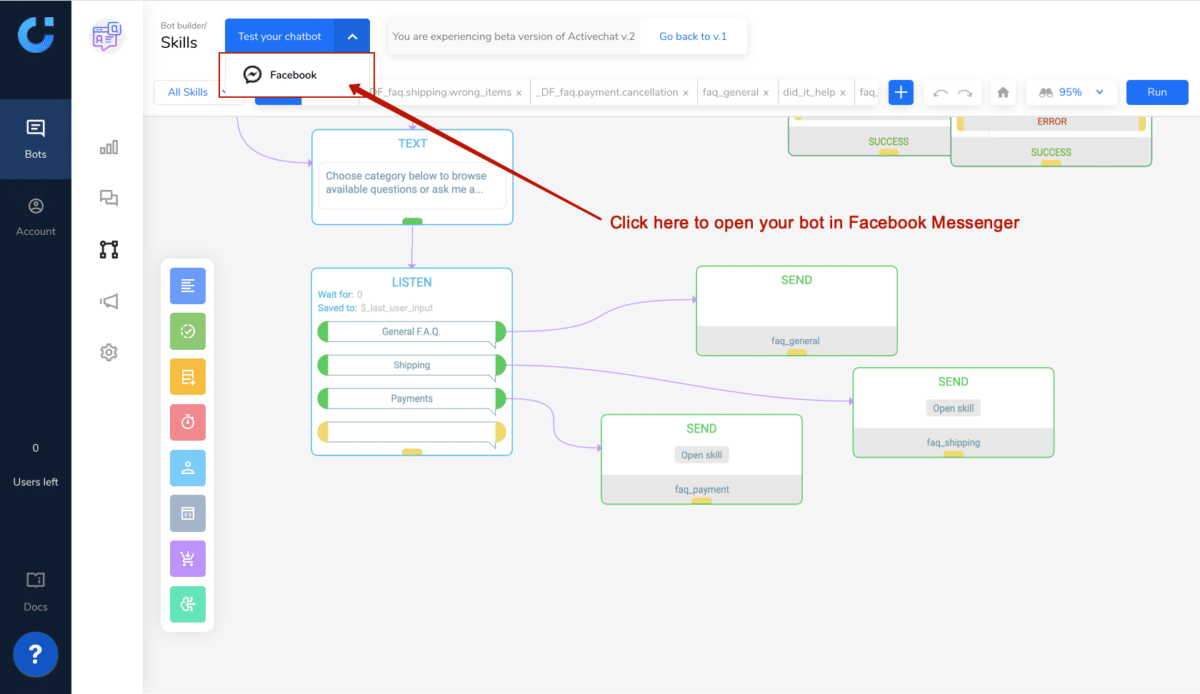
Once your bot is connected to a Facebook Page, you will be able to open conversation with the bot on Facebook Messenger right from the “Test your chatbot” button, clicking the down arrow on the right.
If you’re using WordPress, the installation of the chat widget is very easy – just install and activate our WordPress chatbot and live chat plugin and paste your chatbot ID in the settings. Bot ID can be found in the “Settings – General – Advanced” in the main menu. For more details, check our “How to install pixel and website chatbot with WordPress plugin” guide.
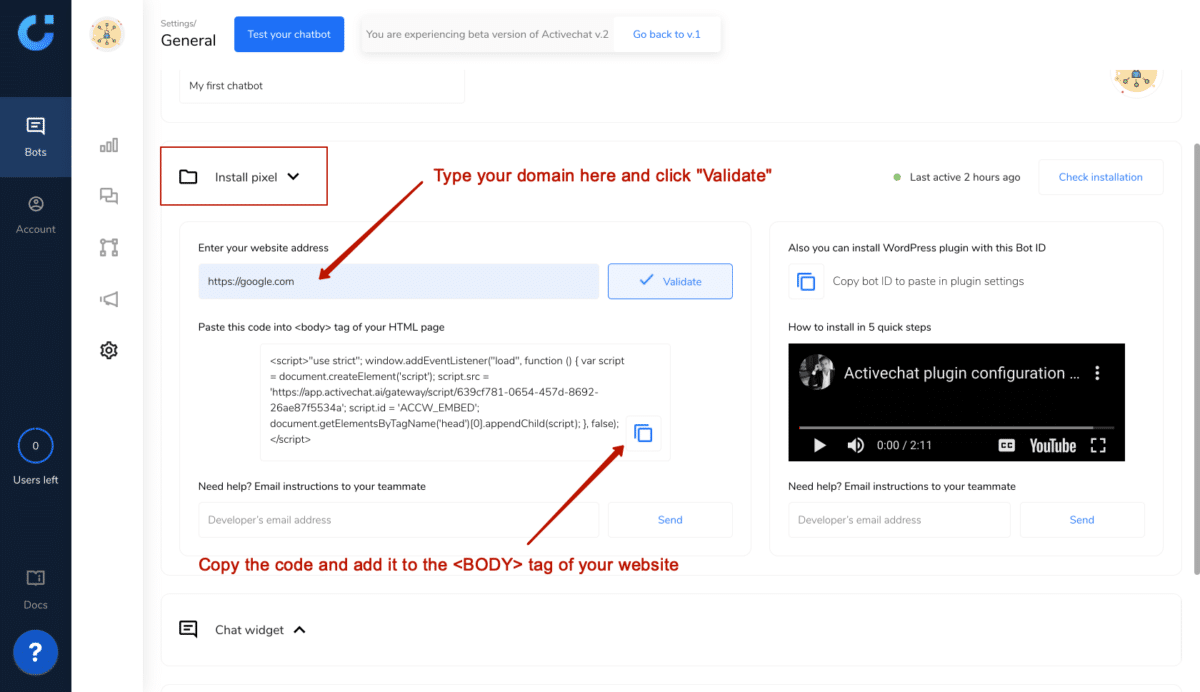
For those of you who use other web platforms, installation can be done by adding some lines of code to the <BODY> tag of your webpage. It will install the website chat widget and activate the chatbot pixel so that your bot will be able to interact pro-actively with your website visitors (more on this in the next series of this onboarding guide).
Go to the “Settings” menu and click “Install pixel”. Type in your website domain and click “Validate”, then copy the code and paste it into your web page.
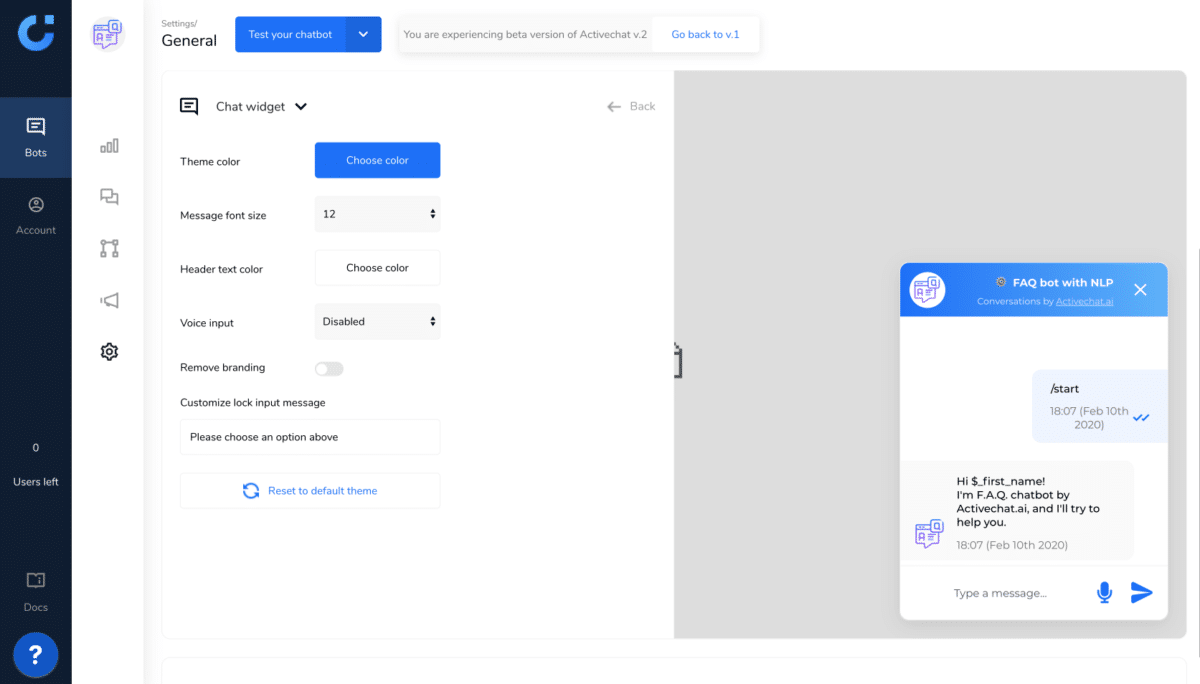
Finally, let’s choose and customize the chat widget for your website. Go to “Settings – General – Chat widget” and choose one of the options – “Activechat widget” or “Facebook messenger”. Each option has its pros and cons. Not sure which one to choose? Check our Website chat widget guide.
Click the gear icon next to the selected widget to customize its appearance – fonts, colors and messages.
Congratulations! Your brand new lead generation chatbot is now live, connected to your website and to your Facebook page! It will collect lead data for you automatically, 24/7, and you can relax for a while and think about how it can be improved in the future. Opportunities are endless – we’ll be adding more advanced features like keyword detection or pro-active page-specific messages in the next series of this onboarding sequence.
This step (and the next one on CRM integration) is intended for users who already have some basic chatbot knowledge and want to explore advanced Activechat features and integrations. You can skip it if you’re just starting and get back to it later when you get used to our flow builder.
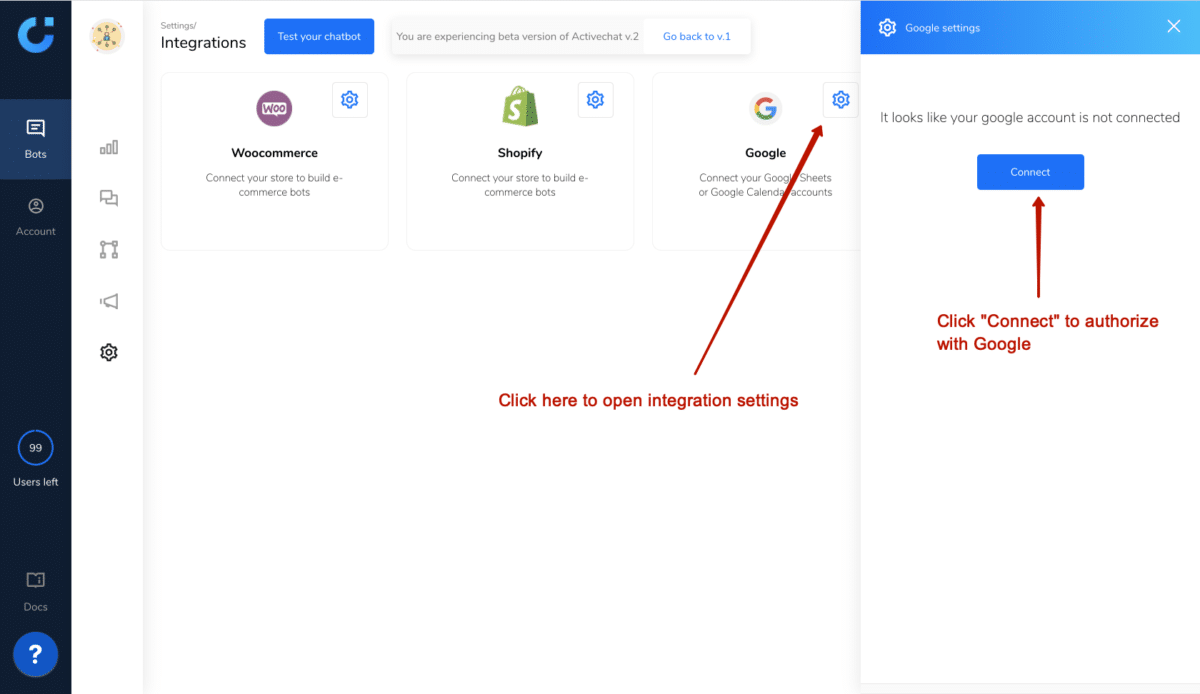
Getting lead data in your mailbox is nice, but when the number of leads grow it can easily become hard to manage. Let’s connect your chatbot to your Google Sheets account and push lead data into the spreadsheet there.
First, you need to connect your Google account. Go to “Settings – Integrations” in the main menu and click the gear icon in the “Google” tile. When you do this for the first time, the window will show “It looks like your Google account is not connected” message. Click “Connect” to fix this.
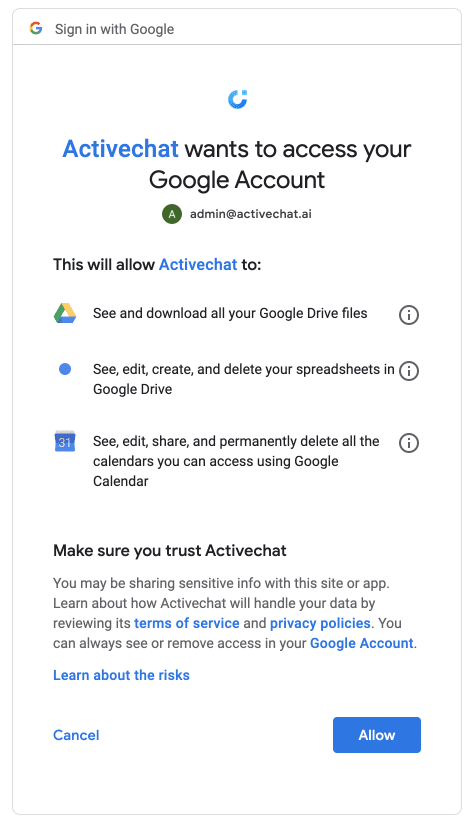
You will be taken to the standard Google authentication process, where you will be able to choose one of your Google accounts to use (if you have multiple). Click “Allow” when asked for permissions to access your Google Drive
Once you do this, a list of your Google Sheets (with their IDs) will be displayed in Activechat. Click “Refresh” to update the list when you add new Sheets in your Google Drive.
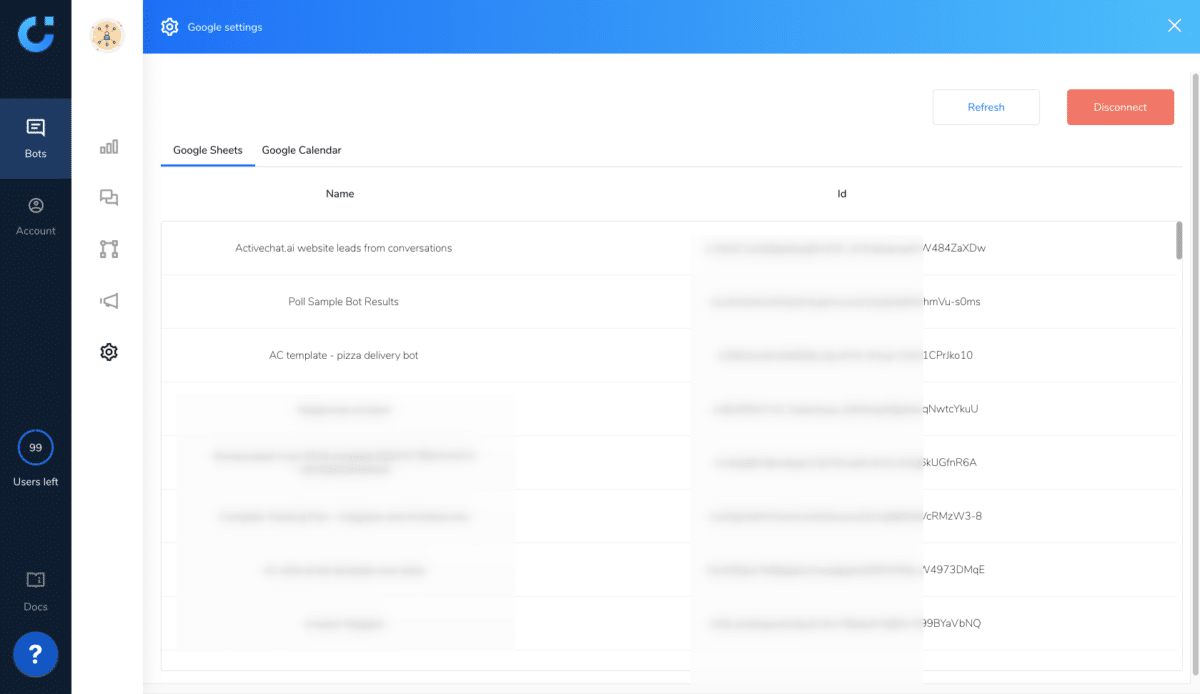
Create a new empty spreadsheet in your Google Account to store lead data from your chatbot and click “Refresh” to fetch its name and ID into Activechat.
Now, open the visual flow builder again (select “Bot Builder – Skills” from the main menu) to choose which spreadsheet to use to store lead data.
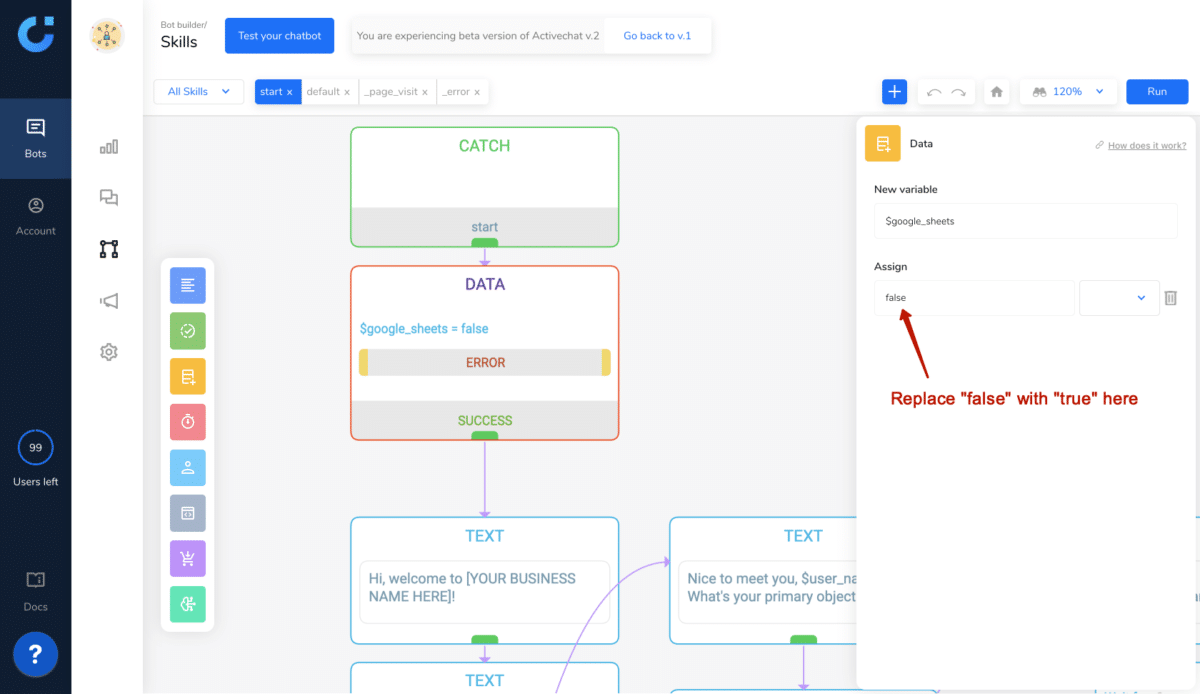
Remember that DATA block at the very beginning of your “start” chatbot skill? We did not mention it in the previous explanation to avoid extra confusion – data processing is one of the advanced features in Activechat. We’re using that block in our template to set the value of $google_sheets attribute. By default, it’s set to “false”, and the chatbot is skipping the integration (you’ll see how it’s made in a moment!). Now, when we have Google account connected, we can set this attribute to “true”.
At the end of our lead-generating conversation flow, there’s a SWITCH block that checks the value of this attribute and proceeds with sending the data to Google Sheets only if the value is set to “true”.
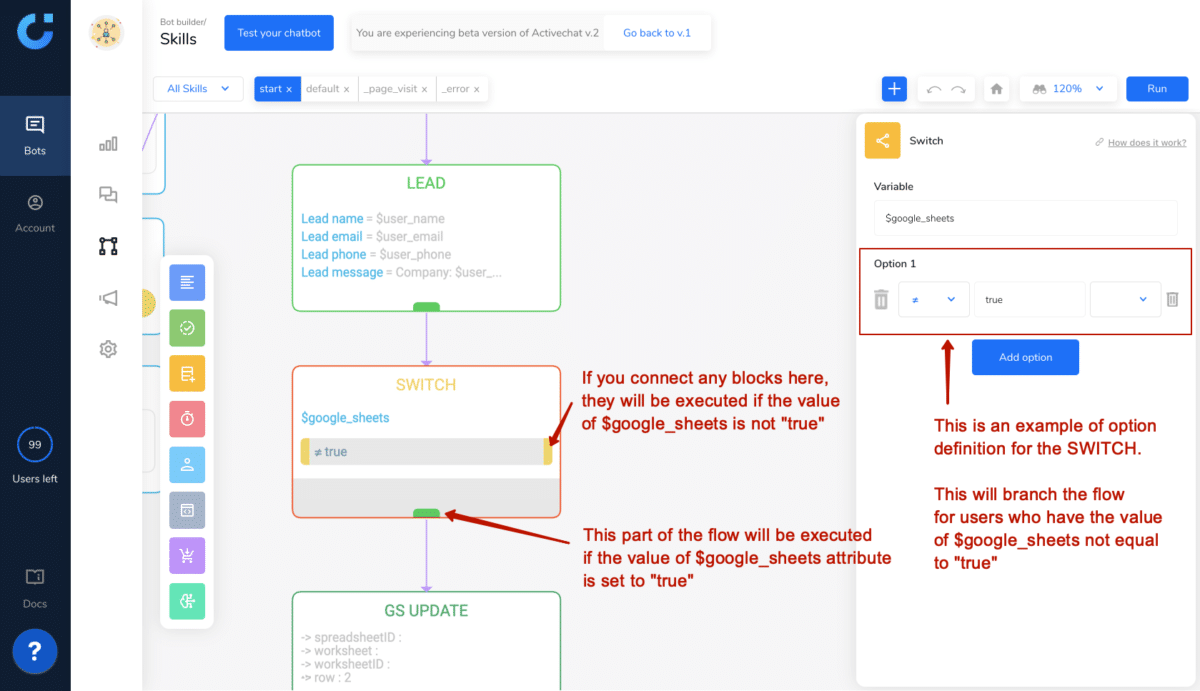
Notice that there are no blocks connected to the “≠ true” condition. It means that when $google_sheets attribute value is not equal to “true”, nothing will be executed. In other case (when $google_sheets is set to “true” by the DATA block at the beginning of the skill), the flow will continue to the next block, which is GS-UPDATE (part of our advanced Google Sheets integration).
Click the GS-UPDATE block on canvas to open its settings and choose your spreadsheet and worksheet in the block editor.

Notice the use of the “Row” setting and “Insert” trigger – this combination tells Activechat to add new data as row #2 in the spreadsheet, shifting existing rows down. This will keep most recent leads at the top of your spreadsheet. Row #1 is reserved for column names.
Further down in the block settings, there are some assignments – which user attributes to put into certain columns of your spreadsheet. As you see here, we store $user_name attribute to column A, $user_phone to column B, $user_email to column C, etc. All these are attributes that the chatbot obtained from your potential customer in the conversation.
Now, it’s time to click “Run” to deploy your changes to the chatbot cloud and test your conversation again. Click “Test your chatbot” and type “/start” in the conversation to re-start the bot. Once you answer all the bot’s questions and new lead notification arrives to your mailbox, there should be a new row in the spreadsheet that you’ve just connected.
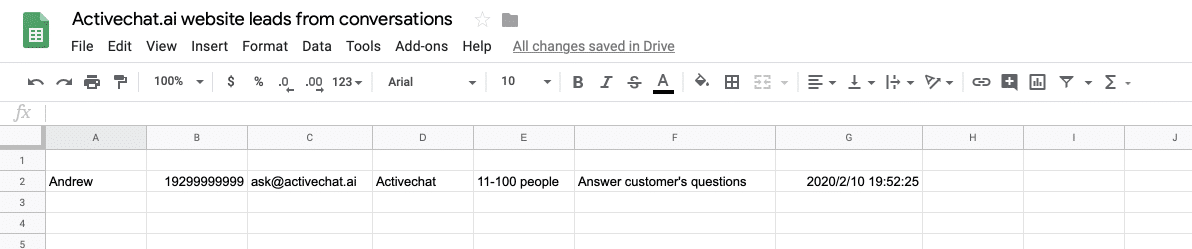
Notice the use of system attributes ($_year, $_month, $_hour, etc) to store the exact time when specific lead was captured into column G.
For extra convenience, give your columns specific names to make it easier to understand. Use row #1 for this, since new data will be added by your chatbot from row #2.

Now you can share this spreadsheet with other people on your team and they will be able to use that lead data to grow your revenue!
Whoa, this stuff is really advanced! If you’re not satisfied with leads in the Google spreadsheet, you can go further and integrate your chatbot with a CRM of your choice. We’ll use Zapier for this, but you can do the same with other services like Integromat, or even connect the bot directly to your CRM’s API.
To use this feature, you will need to create a Zap that will be triggered by a webhook, and set up a JSON block (connect it in the flow instead of the GS-UPDATE – or after it, if you need leads both in Google Sheets and in CRM).
For more details, check our “How to send data to Zapier” how-to. It’s based on a similar lead generation chatbot and explains how to send data to Pipedrive, but you can use it to connect any of dozens of CRMs supported by Zapier.
In this short tutorial we’ve just scratched the surface of the Activechat visual chatbot builder. In the next series we’ll continue to explore more advanced features, such as pro-active chatbot conversations on specific pages of your website, running Facebook Ads to get more traffic to your chatbot, using keywords to answer simple questions, etc.
For an advanced version of quick-start with Activechat, try our “Getting started” section of the platform manuals.
Don’t forget to join our Facebook community of more than 3,000 chatbot developers. It’s a friendly group that can provide useful advice, answer your questions and share a lot of chatbot knowledge.
Stay tuned to our emails, and enjoy bot-building with Activechat!
© 2018-2020 Activechat, Inc.